|
Here are some frequently asked questions we get and some general learnings from this project that we would take into future Passive House designs and builds
1. How much did it cost? This home cost $470,000 that includes the buildings (house, car port and garage) and structural landscaping (all retaining walls, side fencing replacing and the front brick pillars) This is at our cost price, naturally we didn't pay a builders margin. 2. How does the cost compare if you were not building a Passive House? We have calculated that this house cost 12% more than if it were a 'standard 6 star energy rating' home. These are the major elements of the Passive House and their budget impact 1. Heating & Cooling
3. Airtight Wrap & Taping
4. Insulation
5. Additional framing materials (walls and service cavities) For our house and the way it was designed the approximate cost of additional materials needed is $7,500. 6. Labour Approximately 4 weeks additional labour for 3 qualified carpenters is $15,000 7. Passive House Consulting
3. Can you hear the mechanical ventilation unit running? The thick walls and floor of insulation plus the triple glazed windows makes the house very quiet in general so yes you can, however this is really only due to the fact that the entire house is quiet from external noise. It is dramatically quieter than a ducted heating/cooling unit in any other home, and another bonus is there is no draft blowing from the vents like you would from a standard heating/cooling ducted unit. 4. How often do you have to use heating/cooling? In 2019 we plan to more accurately record how many days we turn on either the split system or fireplace, this past year would be a guesstimation of approximately 20 days for the split system (18 days being for cooling and 2 for heating for when we have been away) It's amazing how much general living in the house keeps it warm, for example running the oven, hot water for the shower or bath and just bodies living in the house. If the temperature for the day was forecast to be above about 27-30 degrees we would turn on the split system in the morning on 'night mode' or the lowest fan setting. There were days in the beginning where we wouldn't turn the air conditioner on to see how the house would respond, and when the house reached about 25 degrees it was getting a bit uncomfortable, this would generally be in the mid afternoon. Another point is that because the air is very slow moving through the MHRV system if the weather cooled down at night we would open doors and windows to 'purge' the house. 5. Would you have a fireplace again? Honestly, I think the jury is still out on this one. On one hand we definitely did use it over the winter and the fireplace is very efficient in itself. My past experiences of a Coonara is that you could comfortably sit in front of it, but the Euro Fireplace we have can let off some serious heat for such a small chamber! In the beginning I remember one day we had the fire on and a roast in the oven and I actually had to opened a window to cool the house down because it was so warm. So on the other hand now that we have experienced a winter and how much the house retains heat I could understand why you don't need the fireplace. 6. Does it work? It really does! I think after living in the house for a year you almost take it for granted, but then you will catch yourself either noticing something about another house your in or a hotel you stay at that you don't have to think about in your own home. Just generally coming or going in and out of the house is when you notice how comfortable the temperature is, and then knowing there is no heater or cooler on is pretty amazing. One of the tell tale signs of it working is seeing the condensation on the windows on the outside. Honestly sometimes waking up it doesn't even look that cold outside but there will be condensation on the windows. 7. What would you do differently? Sliding Doors instead of French Doors We would do a lift and slide back door instead of the french doors leading to the deck. Originally we did the French doors because they could be airtight and they fit the traditional style, however they are heavy doors and having little ones around now they are not particularly user friendly. Single Pane Window in Living Room In the living room is the biggest window of the house, and it has a openable section which isn't really needed, I would make this one single pane of glass. Knowing what the window manufacturers are capable of in Europe does open up more possibilities of glazing to such a high standard. Heat Pump Hot Water Unit We didn't really do much investigating into this at the time and went with a pretty standard Hot Water unit set up, being a evacuated tube storage unit, however now knowing more about the efficienciesof the Heat Pumps would look into these more. 8. Would you do it again? Without a doubt, couldn't go back. 9. General observations of living in a Passive House
3 Comments
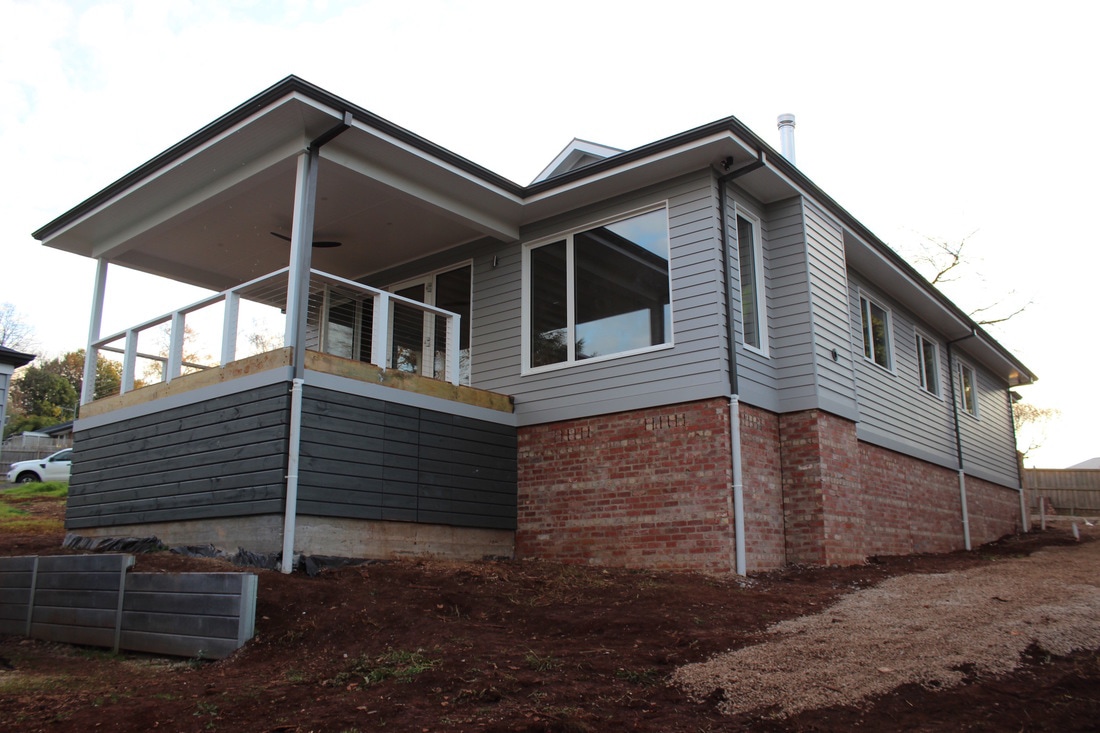
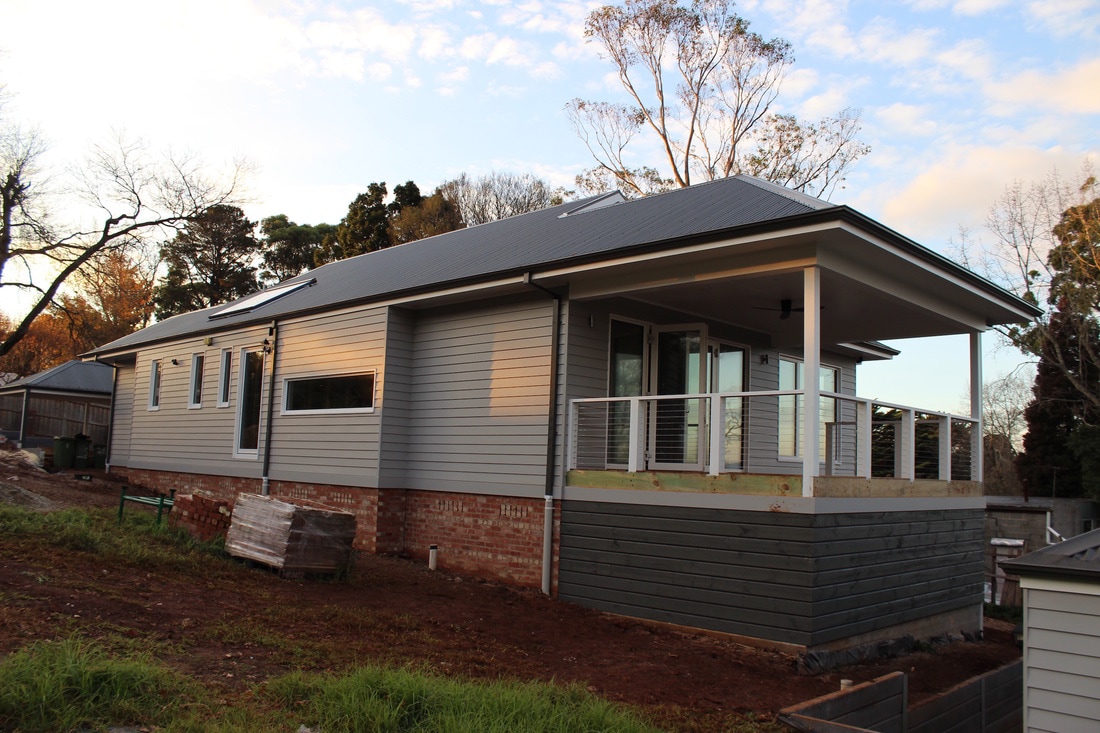
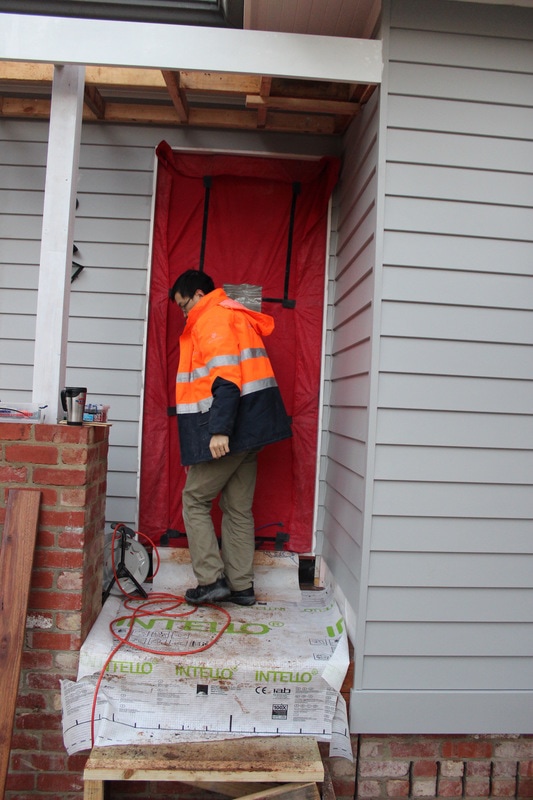
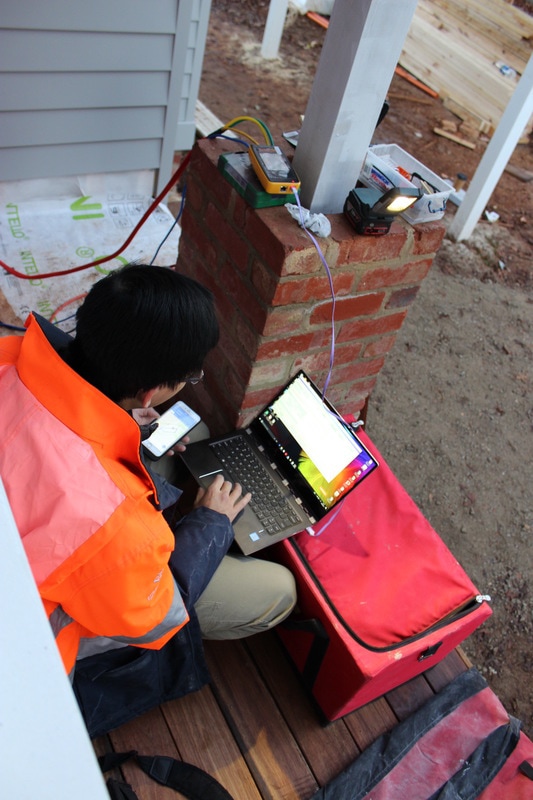
Well close enough, we moved in October 2017, with still lots of bits a pieces to finish off. Some of the light fittings we hadn't decided on, we had no mirrors (due to light fittings), no curtains and don't get me started on the landscaping and the red mud that stains anything in its path but we were in and its all part of the experience of a new home. From a Passive House perspective there were a couple of final elements to complete. Firstly, the Mechanical Heat Recovery Ventilation (MHRV) needed to be commissioned. Unfortunately I didn't take any photos, but essentially each rooms air flow out of the vent was measured and then restricted if necessary according to the volume of air needed in each room. Secondly, we had our final blower door test done again by Joseph at Efficiency Matrix. Although quietly confident nothing had gone too severely awry you never know. But the final test came in at .41 ACH so comfortably within the .6 ACH or below needed to be certified. 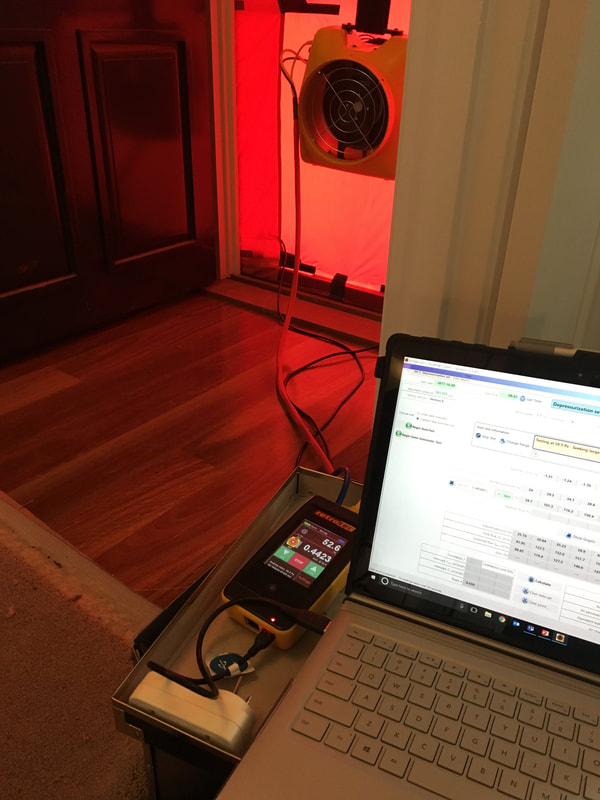 When we set out on this project the goal was to build a traditional style family home, staying close to standard building practices and by just looking at the home you would never know it was a certified Passive House and last but not least for a modest budget. 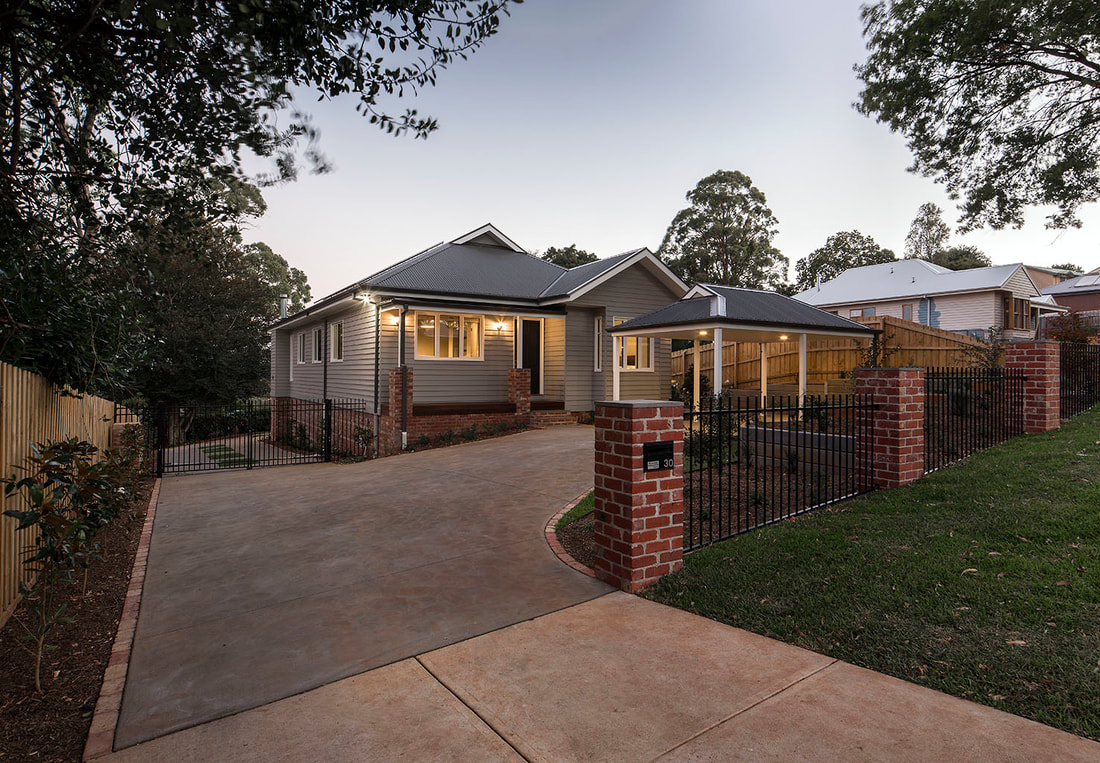 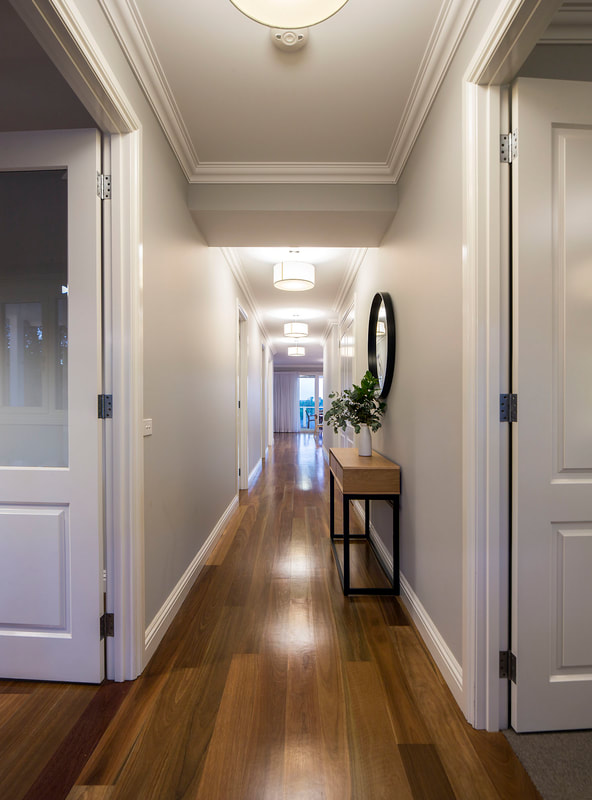 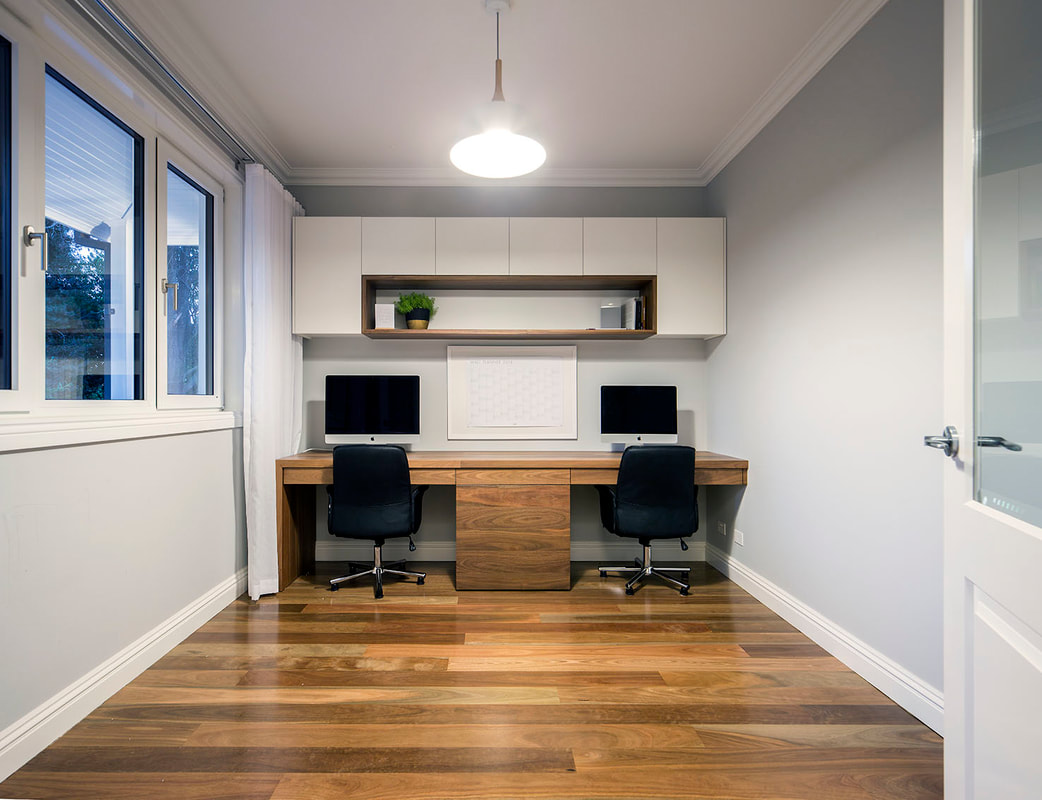 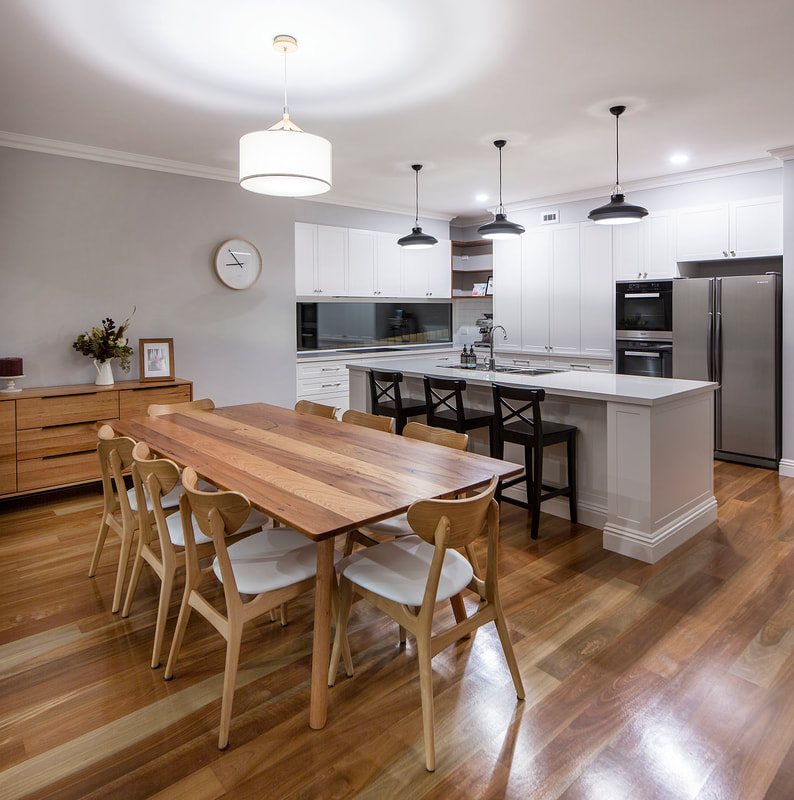    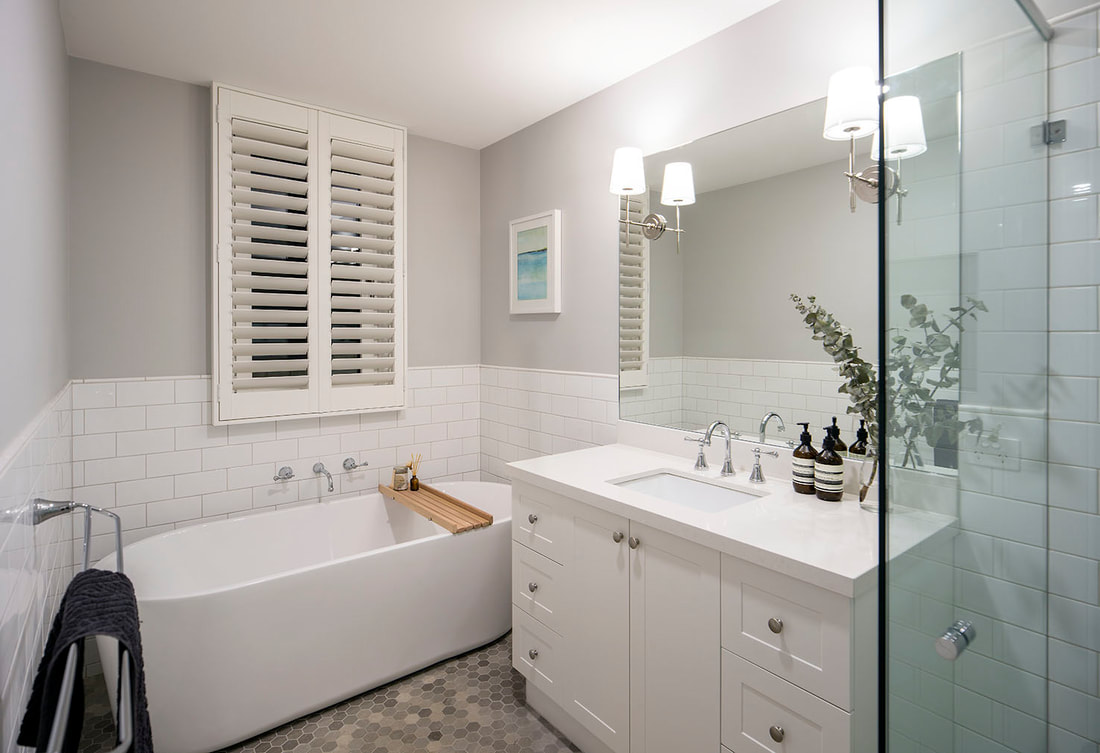 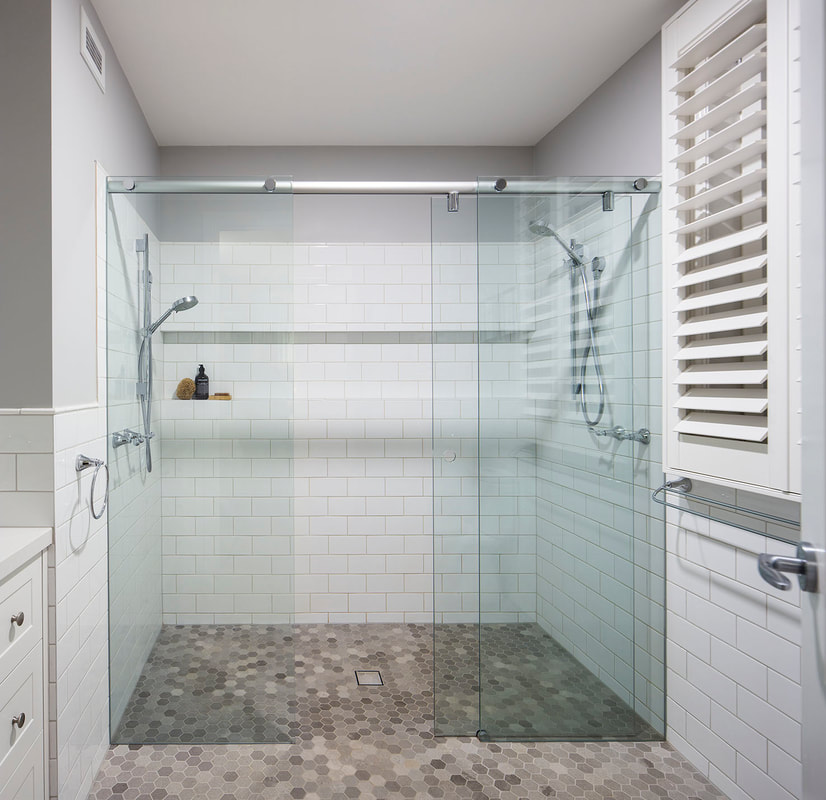 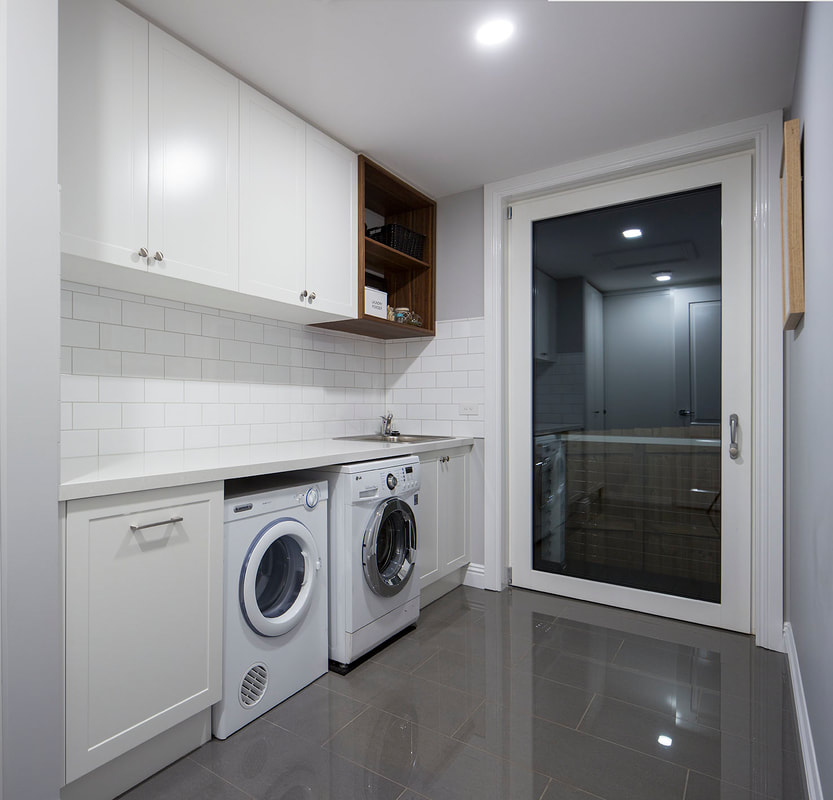  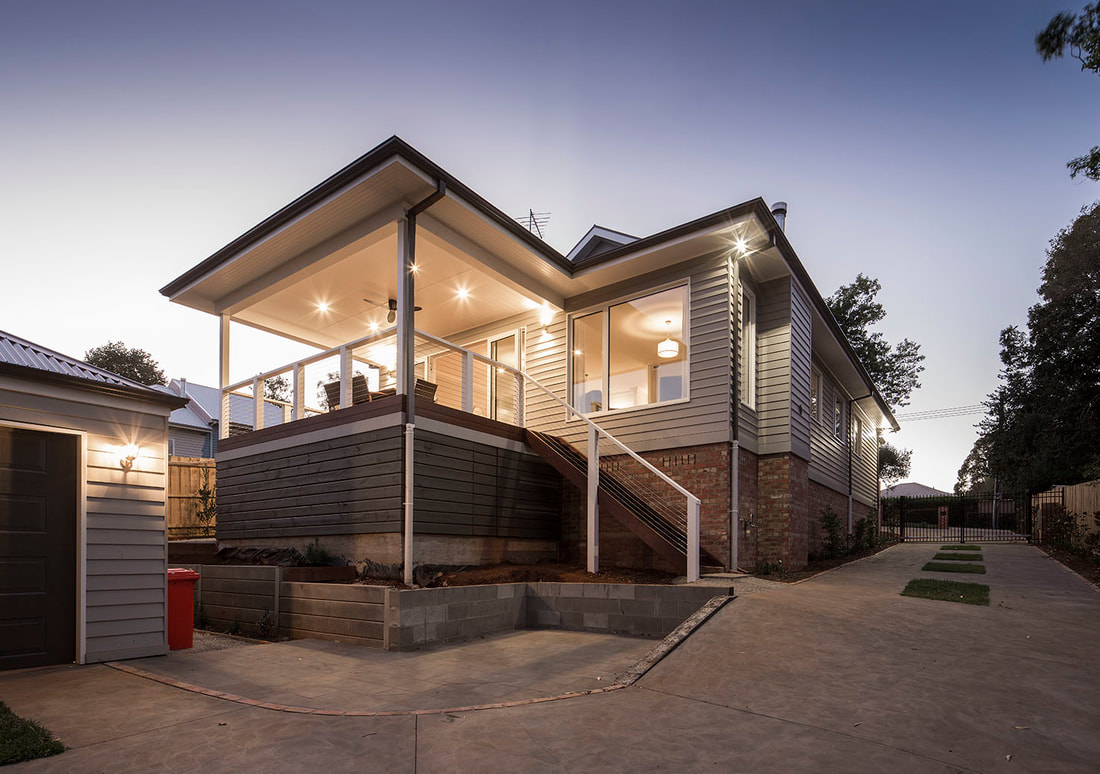 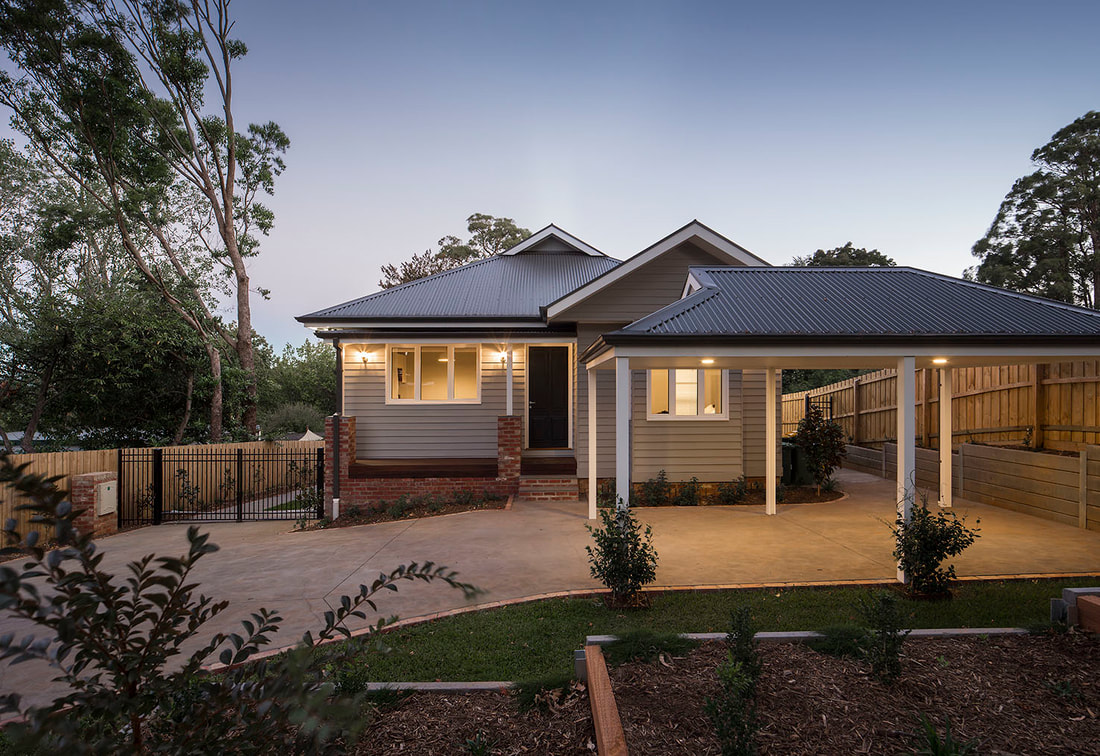 Overall we are very happy with the finish, there were lots of challenges and things to learn along the way, and has built confidence and experience in this area of building that is only growing as more people learn about the benefits.
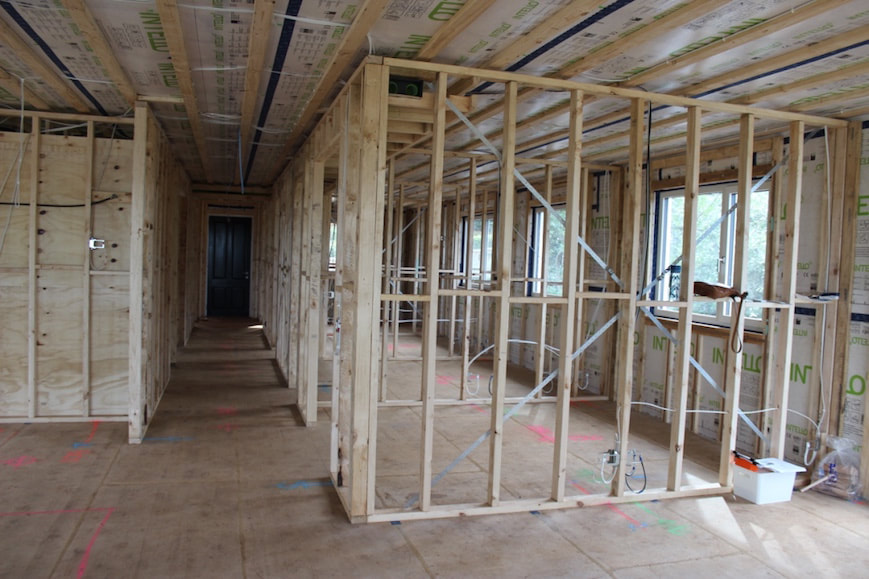
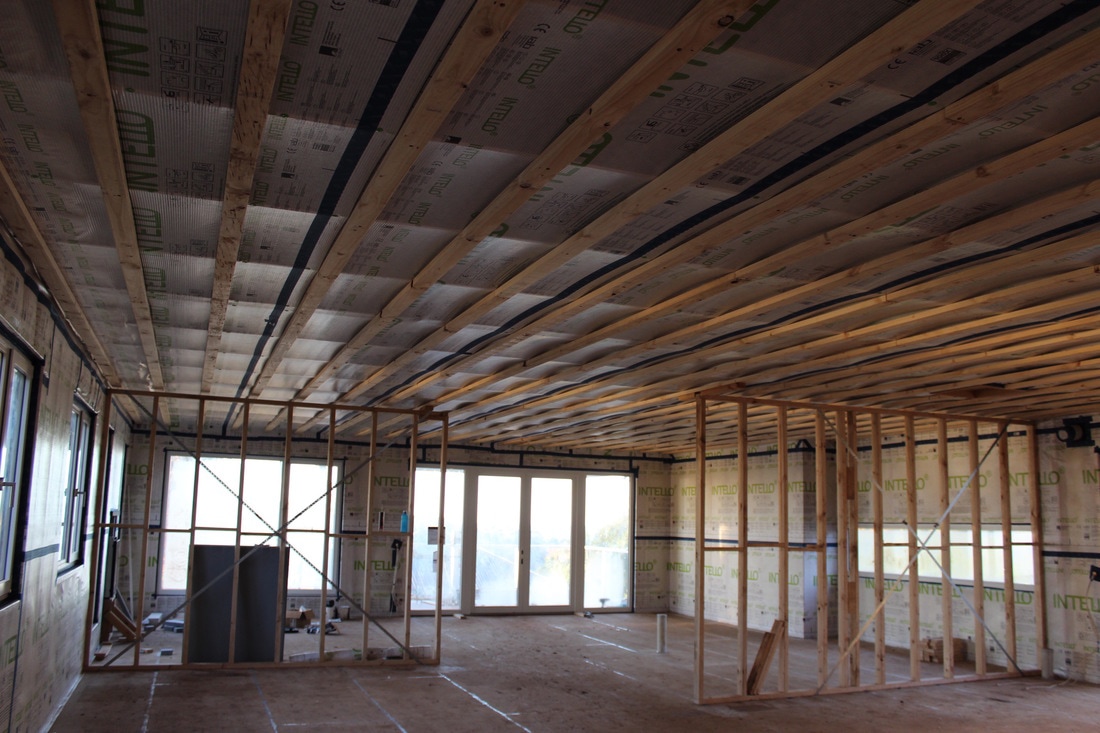
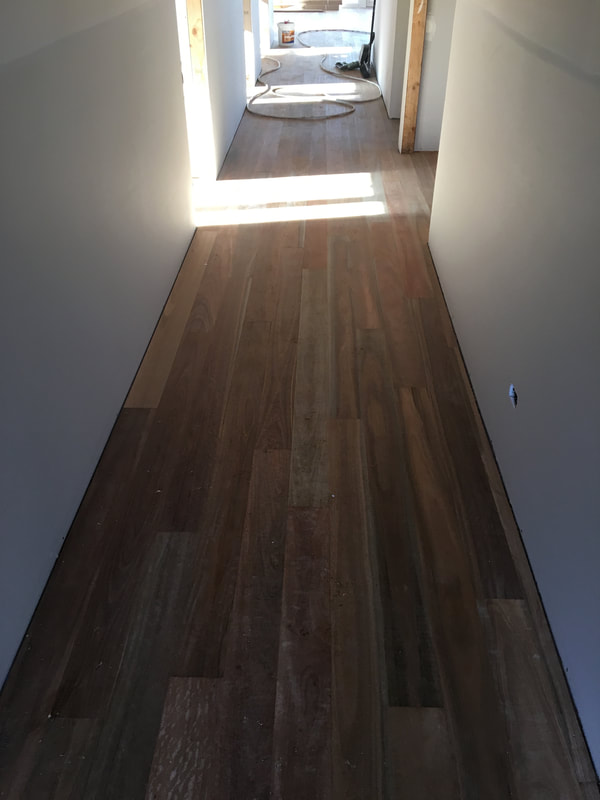
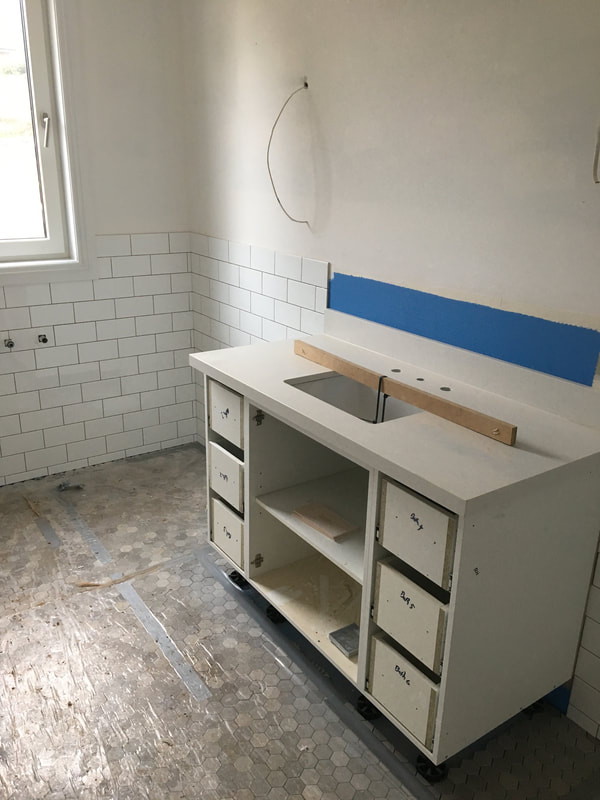
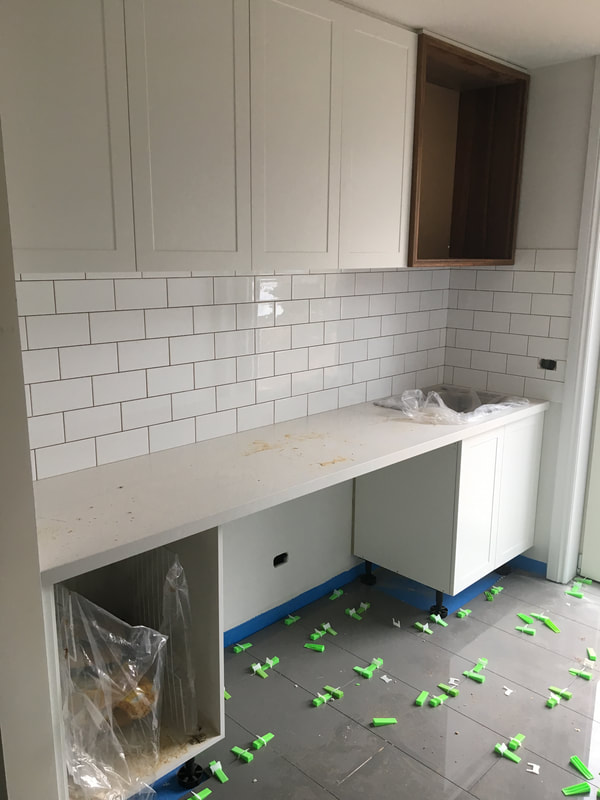
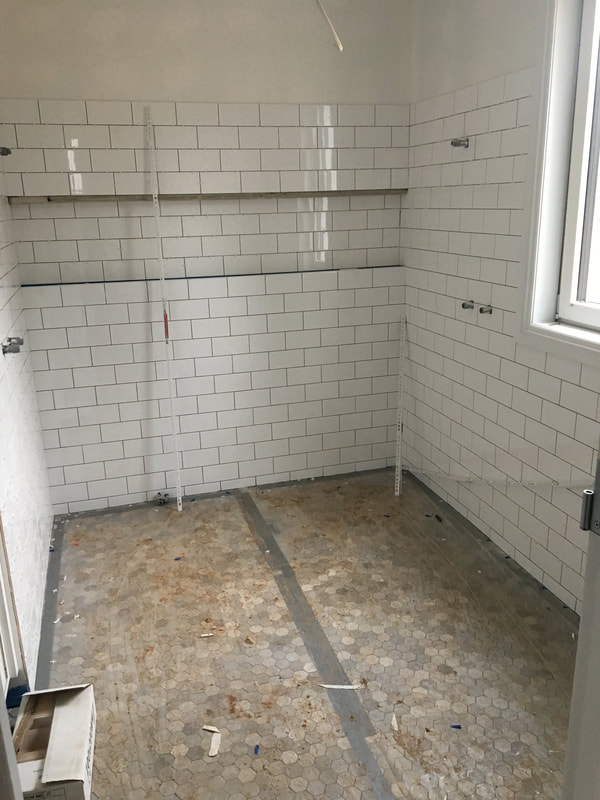
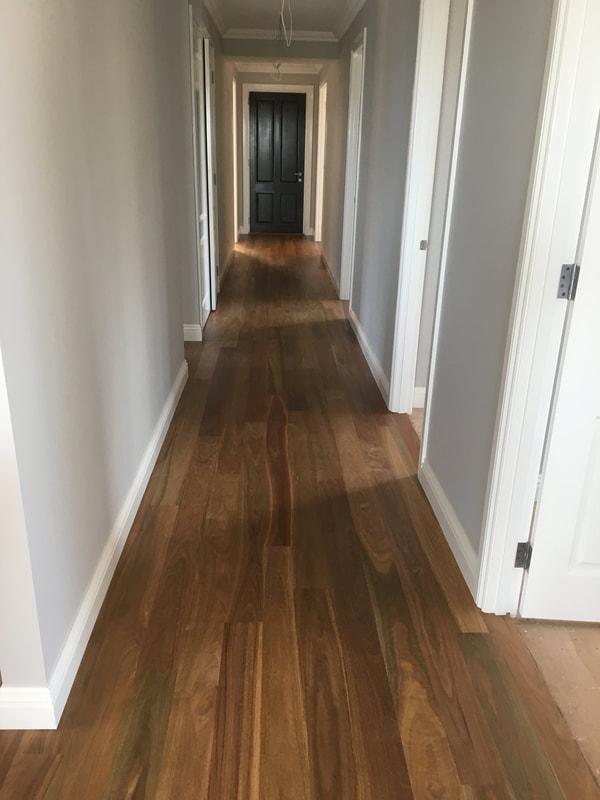
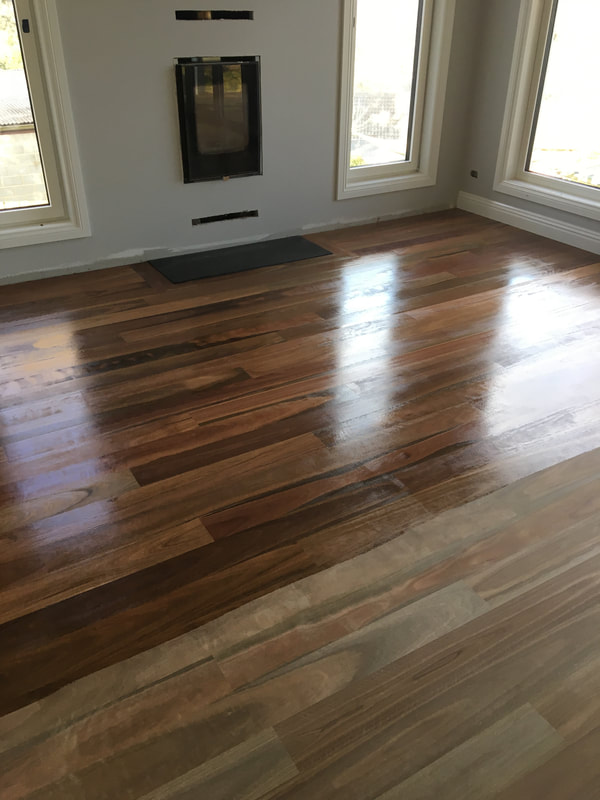
Fortunately Devin and I are generally on the same page when it comes to finishes, there are elements that are more important to me and others to Devin so from that perspective it works well. Also we had quite a clear idea of the look and feel of the house, there are literally endless possibilities and choices for everything and I can understand how when building you get decision fatigue. Being a smaller house however, did mean we were able to choose some elements that are a little but more pricey because you wouldn't need huge quantities for example the larger skirting boards or architraves and taller solid timber doors. After the Mechanical Heat Recovery Ventilation (MHRV) system ductwork was installed, and the other electrical and plumbing had been roughed in, it was time to cover up all that made the house airtight. At this stage there isn't much that needed any specific Passive House considerations, the timber battens as per an earlier post served there purpose to act both as a service cavity for the plumbing and electrical requirements inside the air tight layer, and a fixing point for the plaster to be installed on without penetrating the airtight membrane. After all rough ins and battens (only ceiling had been done up until this point) had been completed and before the plaster was installed we had our second blower door test. This came in at .38 ACH, and so a second sigh of relief from our team as well as from the plumber and electrician this time. We chose a Queensland Spotted Gum for the timber flooring. This was glued and secret nailed directly onto the red tongue flooring. Before the first blower door test the joins in the flooring was sanded and then filled with polyurethane to seal any air leaks. 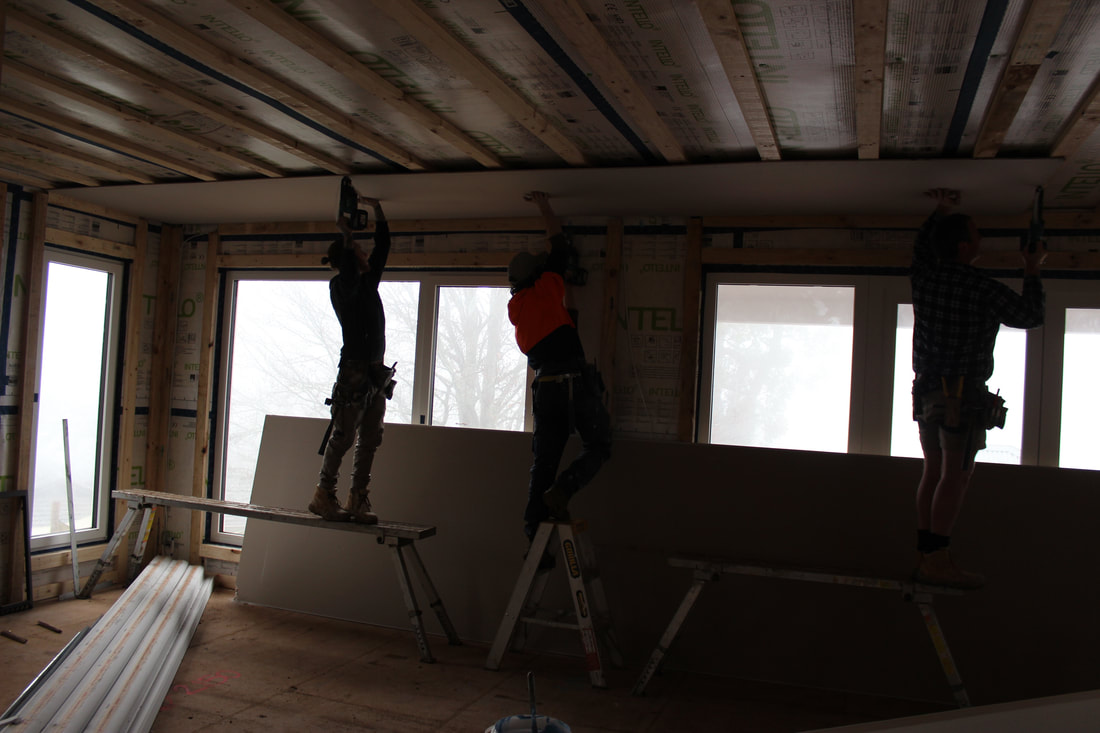 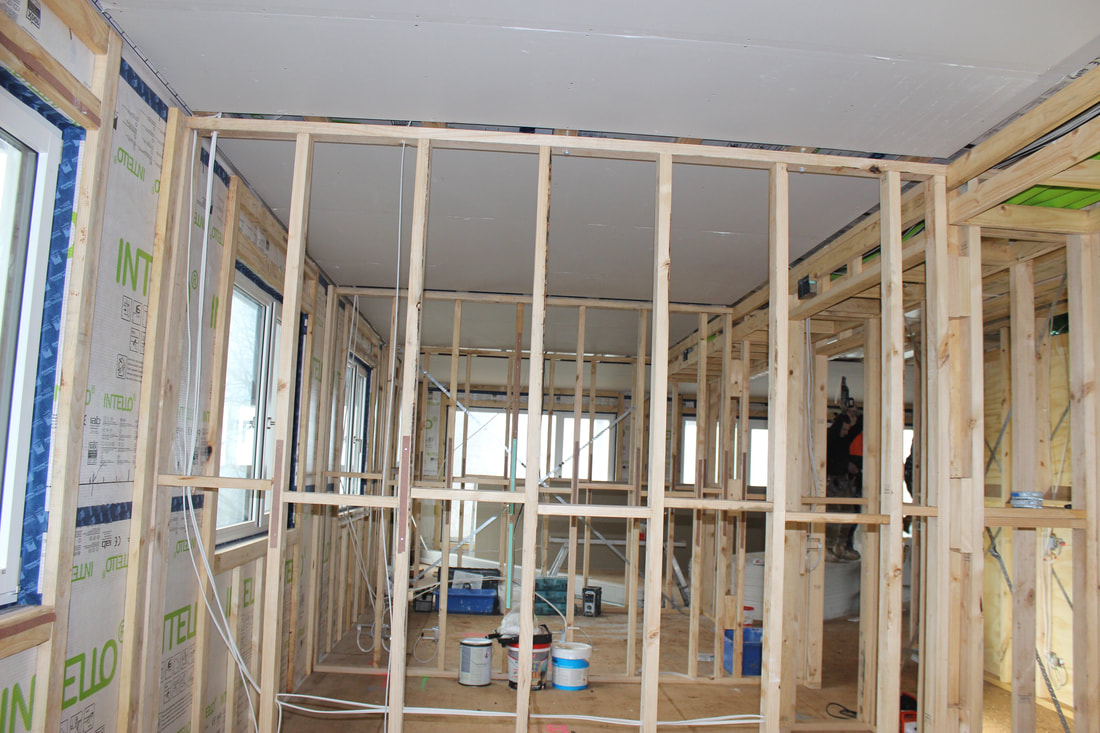  Tiling in the ensuite, bathroom and laundry were layed. Keeping with a traditional feel, the floor tiles are mosaic stone grey hexagons and the walls a simple white subway tile. The laundry floor is a basic great rectangle tile. For all the joinery we went with Albedors Sheree Square profile, it has a matt 2-pac paint finish, colour from memory was Dulux Snowy Mountains half strength. The stone benchtops are 40mm Quantum Quartz White Swirl
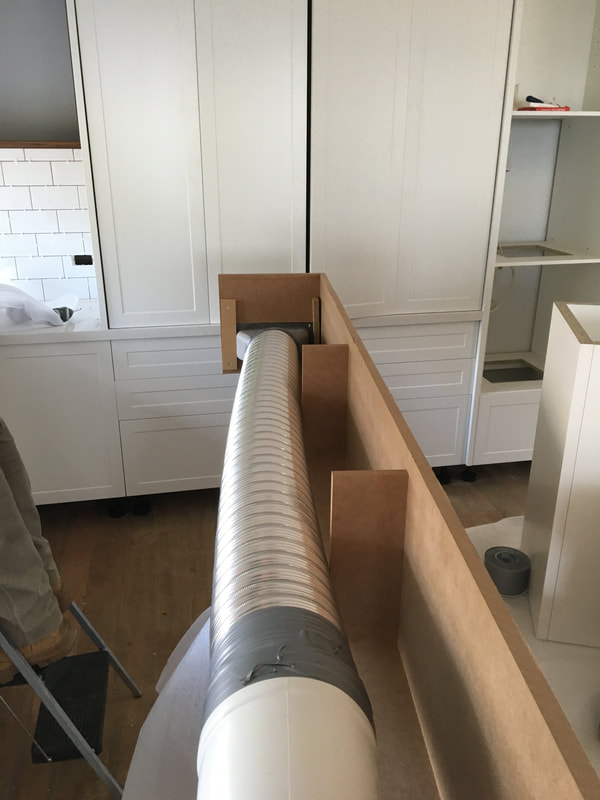
In the kitchen the bulkhead above the rangehood acted as cavity for the rangehood ductwork. Being airtight the rangehood cannot be ducted to the outside, so it has a charcoal filter and the ductwork runs along the top, to the open shelving section in the corner. 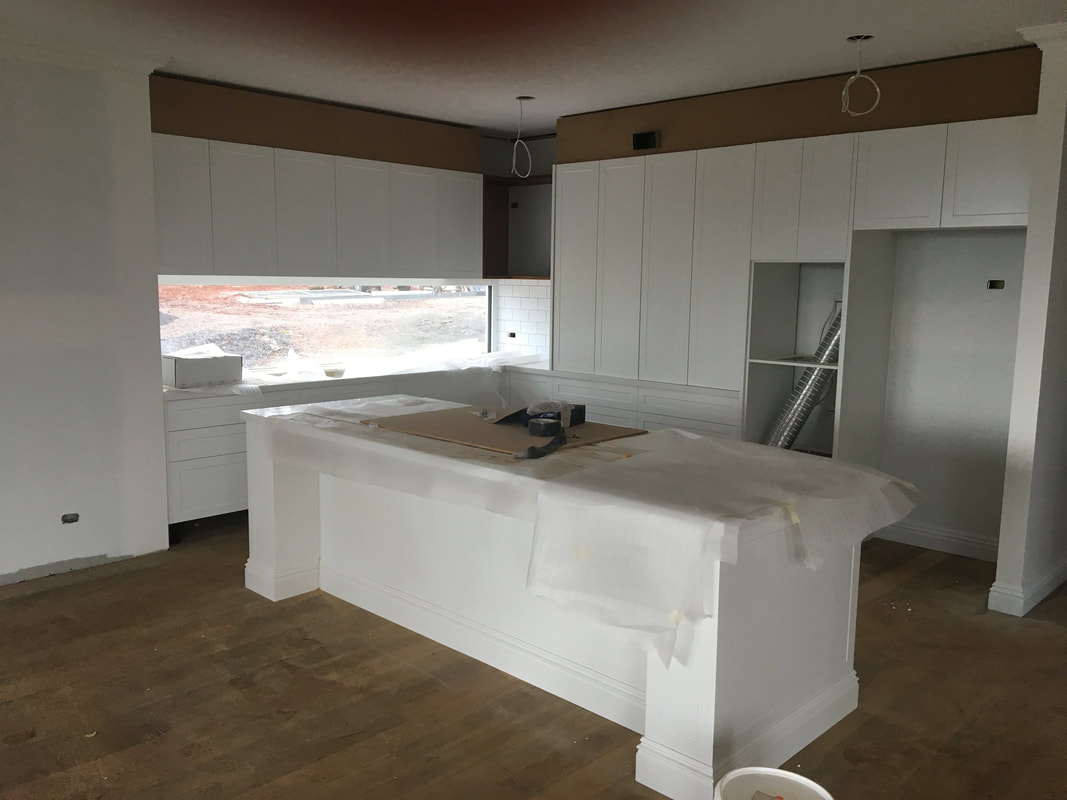
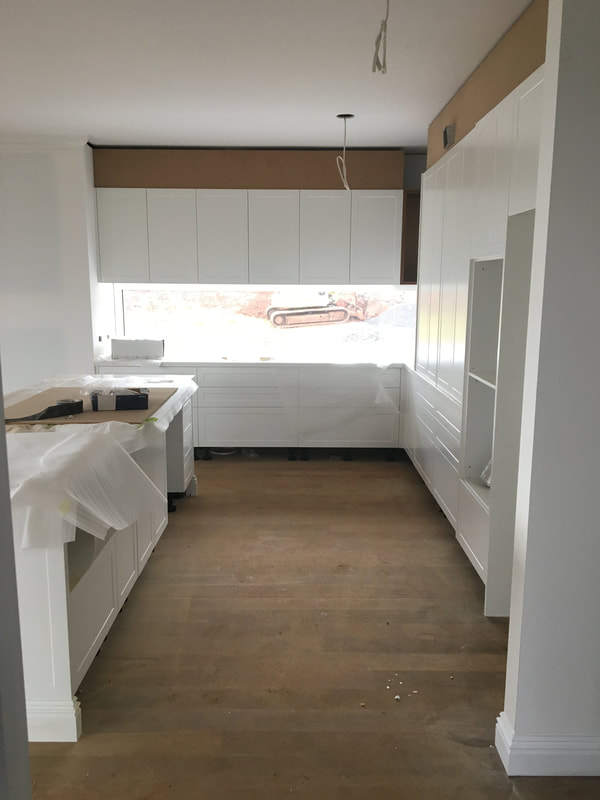
Architraves, skirting boards and doors really start to pull the house together. Our doors are 2340mm high giving a sense of space down the hallway, and the office and rumpus have glass panels allowing more light and again a feeling of more space. The timber flooring was finished with a water based semi-matt polish. 
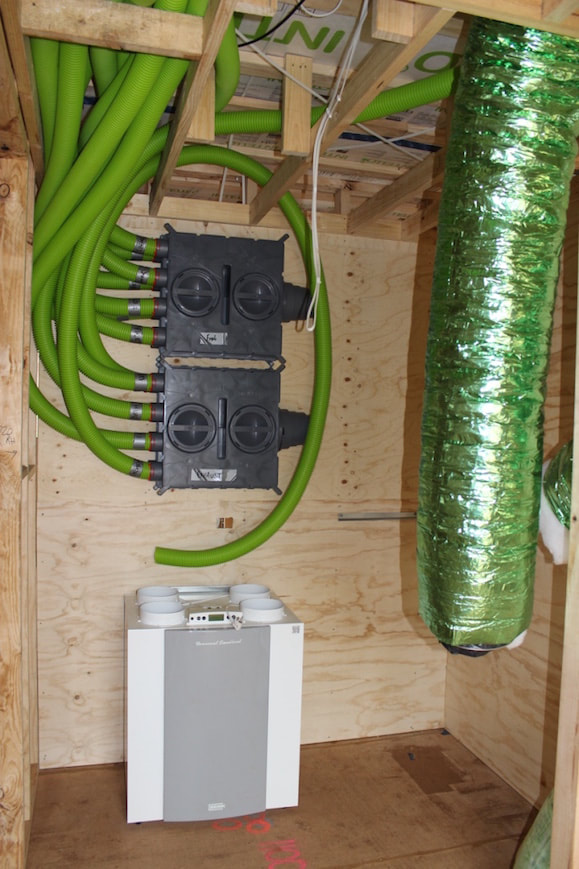
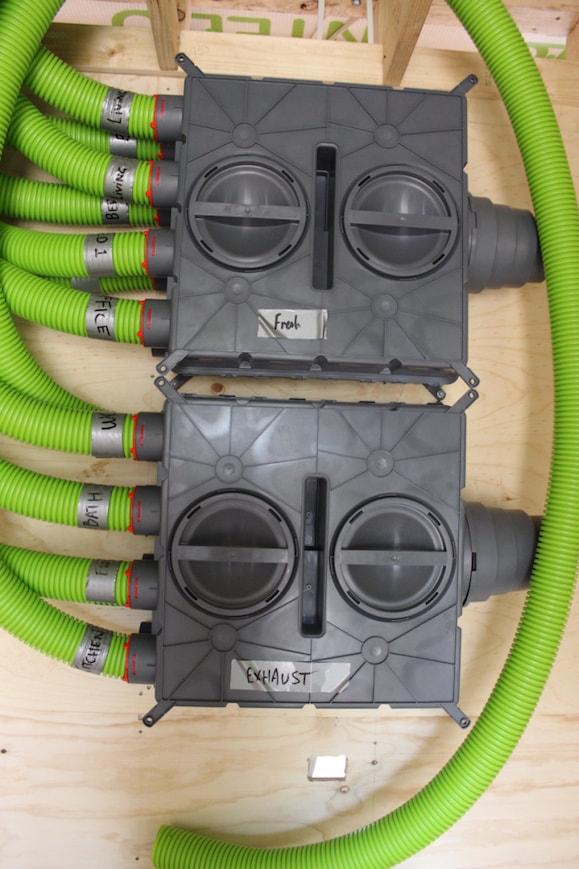
The house is only using electricity for energy and we chose not to be connected to gas, firstly because we have solar panels on the roof so we can offset energy consumption and secondly gas is problematic in an airtight house so we have gone with an induction cooktop. Just another new element of a Passive House to learn and test out. 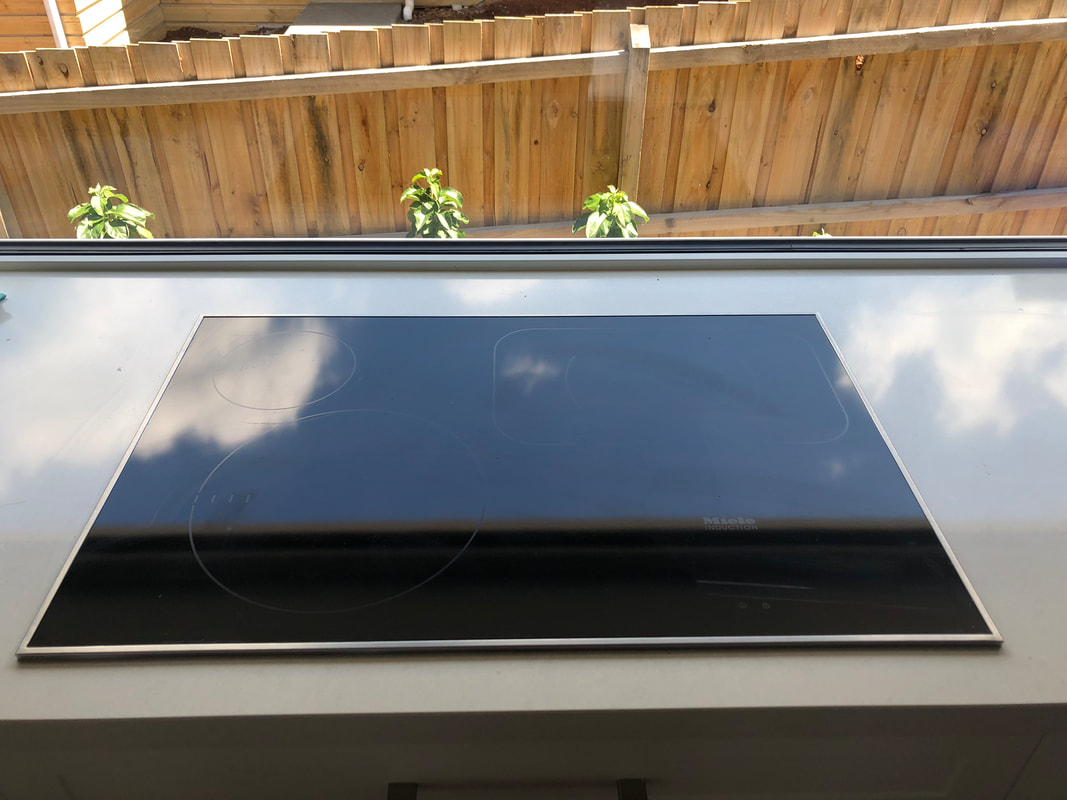 Unbelievably over 6 months have passed since the last blog and in that time we have finished the house and moved in! Where we left off last time was that we had achieved a Passive House standard air-tight house with .36 air changes per hour (ACH). From this point we continued building the inside walls and what was one large room started to become a home. The next Passive House element to be installed was the Mechanical Heat Recovery Ventilation (MHRV) system. I call this the lungs of the house because it brings in fresh air into the house, and exhausts the stale out. If a house is tighter than 5 ACH per hour then a mechanical ventilation system must be introduced. Every 'living room' of the home has a supply of fresh air, so for us bedrooms, living, rumpus and office indicated by the blue supply air on the below plan. The bathroom, WC, laundry, ensuite and kitchen have an exhaust outlet which is the red line on the plan. 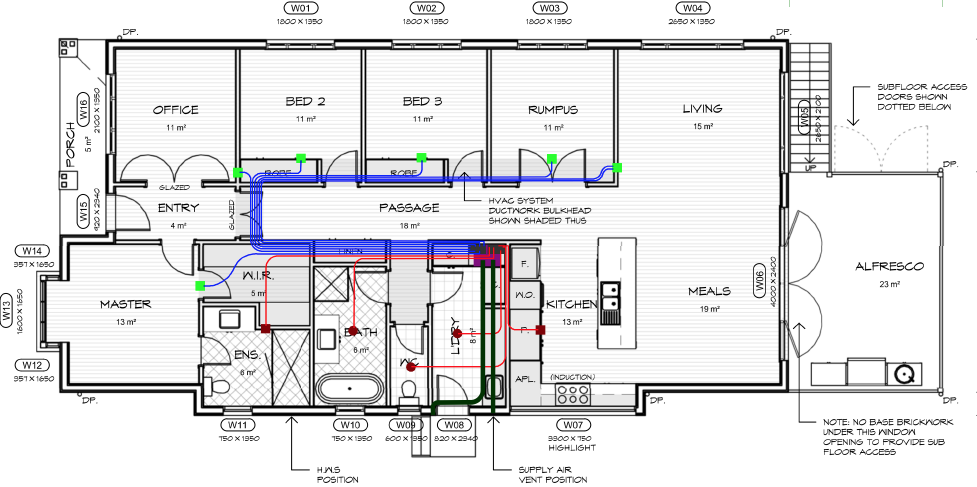 Its a fairly simple concept, as the house is air tight you must ventilate fresh air or the house is unhealthy and all sorts of problems arise, such as mould. The amount of fresh air to be supplied to each room is calculated by the volume of the room, so accordingly on our plans you can see that the living and meals area is supplied with 2 ducts of fresh air for example. The dark green lines show the ducts that vent from the outside to the MHRV. Its important to note that these have to be a minimum distance apart from each other, otherwise you would be short circuiting the fresh and exhaust air. This is the same for the living room fresh air and kitchen exhaust. So as to not jeopardise the airtightness our design kept all the ductwork inside the airtight wrap and used dropped ceilings and bulkheads to hold the ductwork. So the laundry, WC, bathroom and ensuite all have lowered ceiling heights, then above the robes and Rumpus is a bulk head to bring the fresh air ducts to those rooms.
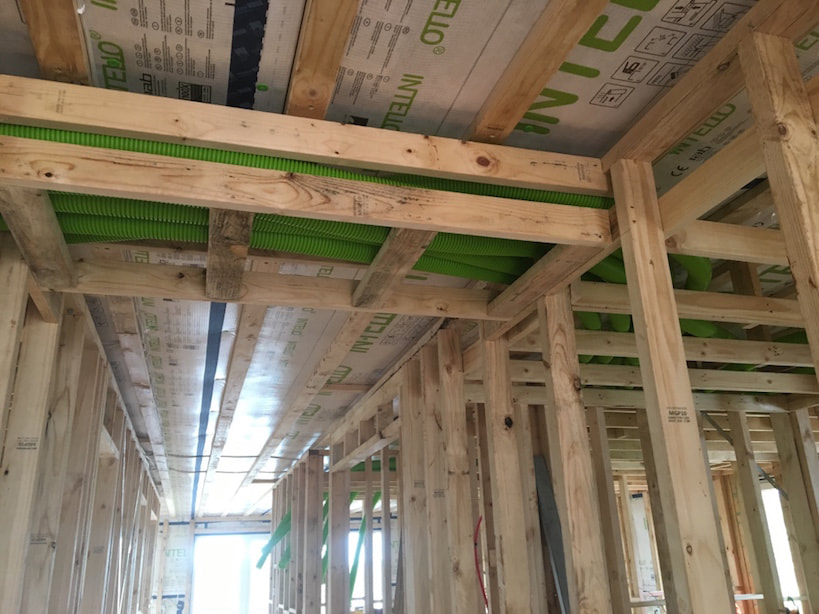  In addition to supplying fresh air, the system as the name suggests utilises the temperature of the air inside the house to heat/cool the fresh air coming into the home. So the basic principle is fresh/supply air comes into the system, it runs through a heat exchanger to adjust the temperature of the fresh air, then goes from the system into the fresh air manifold. Each supply air duct is balanced (this is done when the house is finished) using air flow restrictors at the manifold so that the right volume of air can travel through the ductwork to each room. Then the extract air obviously works in reverse, exhaust coming into the manifold from the house, this goes into the system to utilise the heat and then ducts to outside. In addition to the heat recovery aspect, the MHRV also incorporates two filters, one of the fresh air coming in which removes pollen and dust so it doesn't clog the heat exchanger and the air being supplied to the rooms is fresh and clean. The other filter is on the exhaust so the air being taken from the home is filtered so the heat exchanger is not clogged with dust or debris.
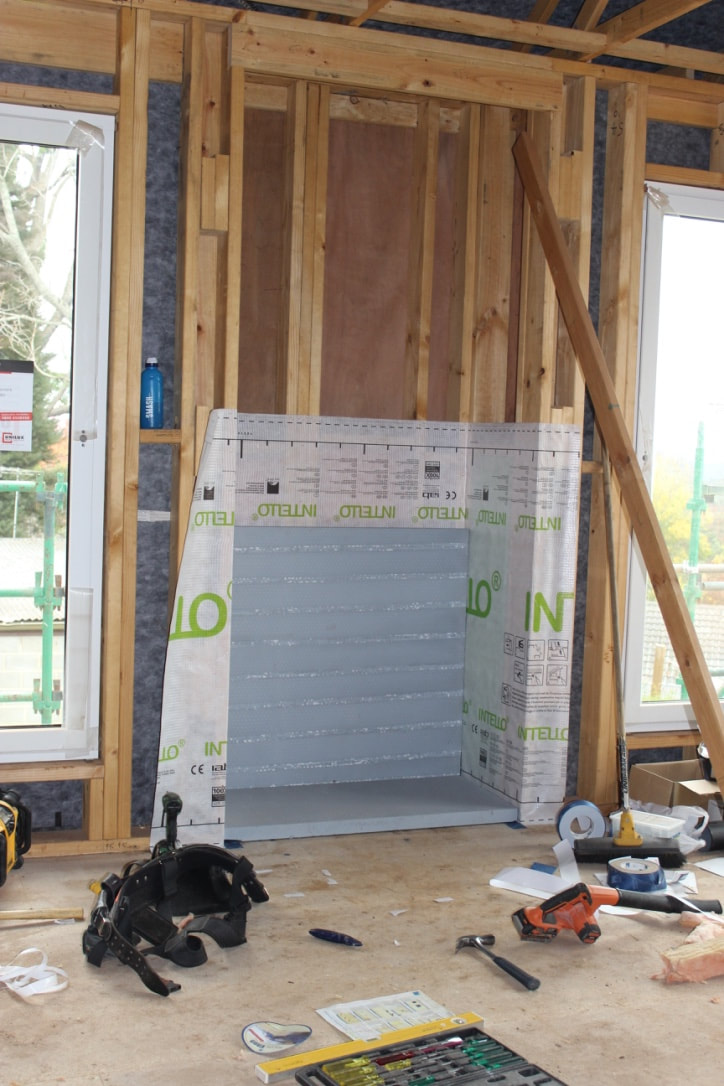
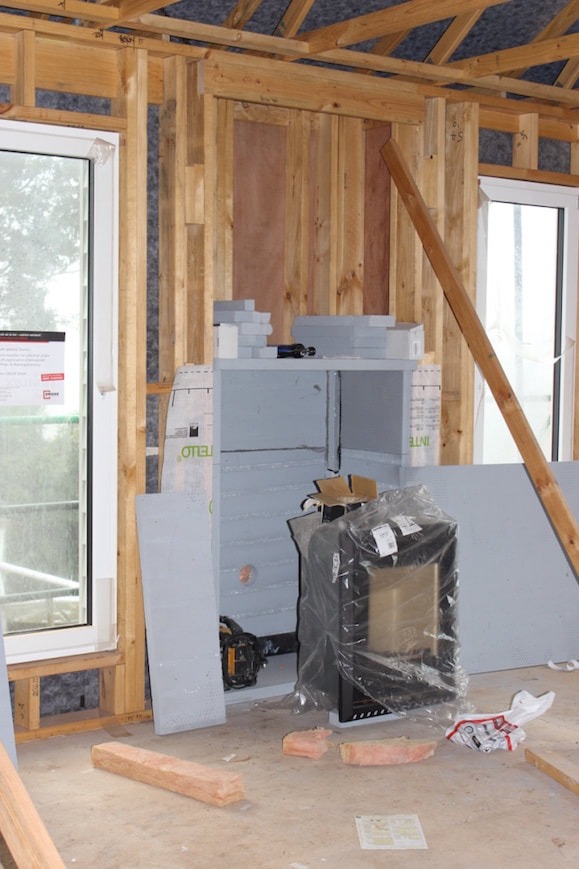
The MHRV system we went with is a BRINK Renovent Excellent 400 Plus which costs just under $8,000 supplied. It was installed by us and then balanced and commissioned once the house is complete. In terms of other heating and cooling, we are installing a 2kw Mitsubishi Split System which costs a little over $2,000 supplied and installed. Its crazy to think that the size of the split system that is sufficient for our whole house, is what a standard home would need just for one bedroom! We have also installed a solid fuel fire place which costs just over $3,000 for the supply of the fireplace and other materials required to install in. I remember when Devin was doing the Passive House Tradesmen course, one of my first questions about it was can you have a fire place? Devin was very reluctant to attempt a fireplace on his first Passive House, and initially we didn't include it in our plans. But for me building a traditional house in the hills calls for a fireplace, and so I put my foot down so to speak and it has been one of the most controversial and stressful elements of the house. The first element to consider is that as the house is air tight so the air supply to the fireplace must be external. That is most coonara style fireplaces use the air from inside the house to feed the fire which is off the table for us. The second element is that the fireplace has to be sealed and airtight to the house envelope. The way Devin approached it was that the fireplace was built on the inside of the air tight wrap and the flue and external air supply were the two points in which it penetrated the wrap and were sealed accordingly. We decided on the 'Ribe Insert' supplied by Euro Fireplaces
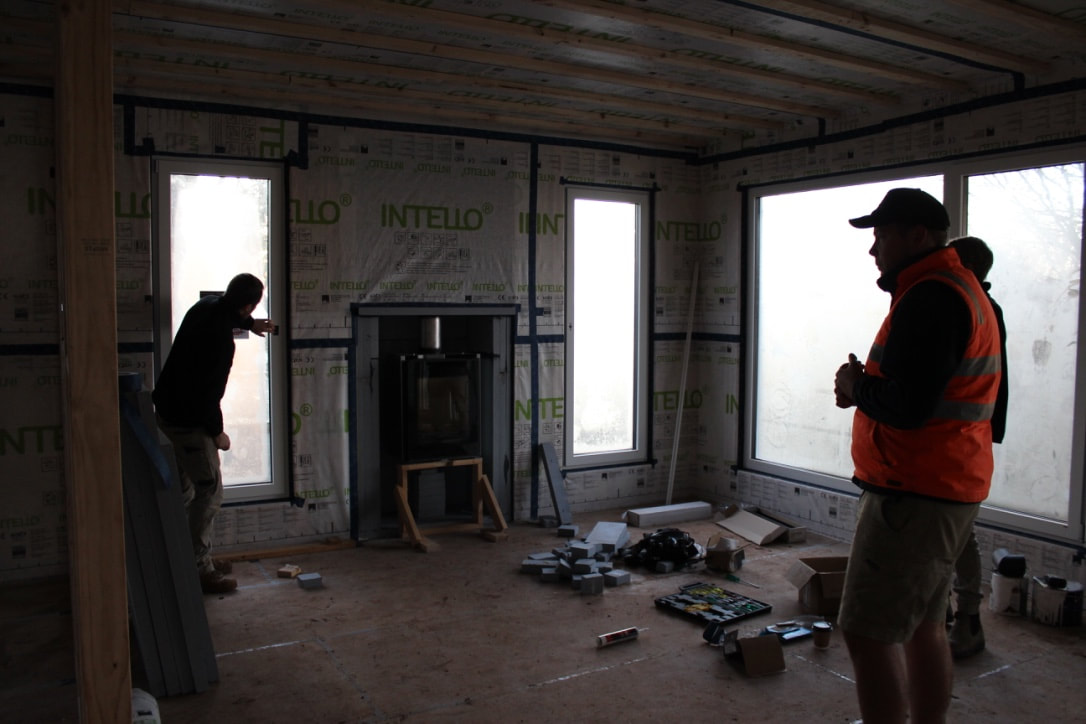 We initially installed the fireplace temporarily (hence the use of the prop holding the fireplace in the above photo) because you cannot block the supply air vent into the fireplace and Devin was very apprehensive of how much air would leak out of what is essentially a hole in the house. So it was a massive sigh of relief after the first air tightness test was passed and it was able to be installed fully. 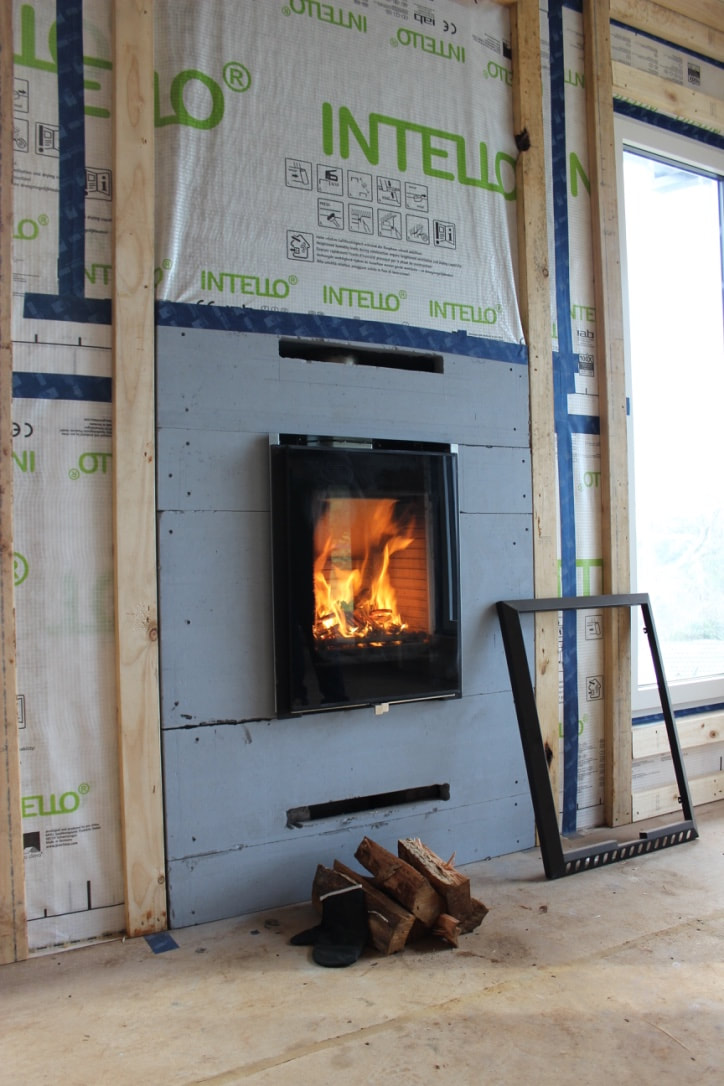 The fireplace works on convection, so there is no fan or electricity to operate the fireplace. Cooler air is drawn into the Skamol hot box through the bottom vent and the warm air comes out the top vent.
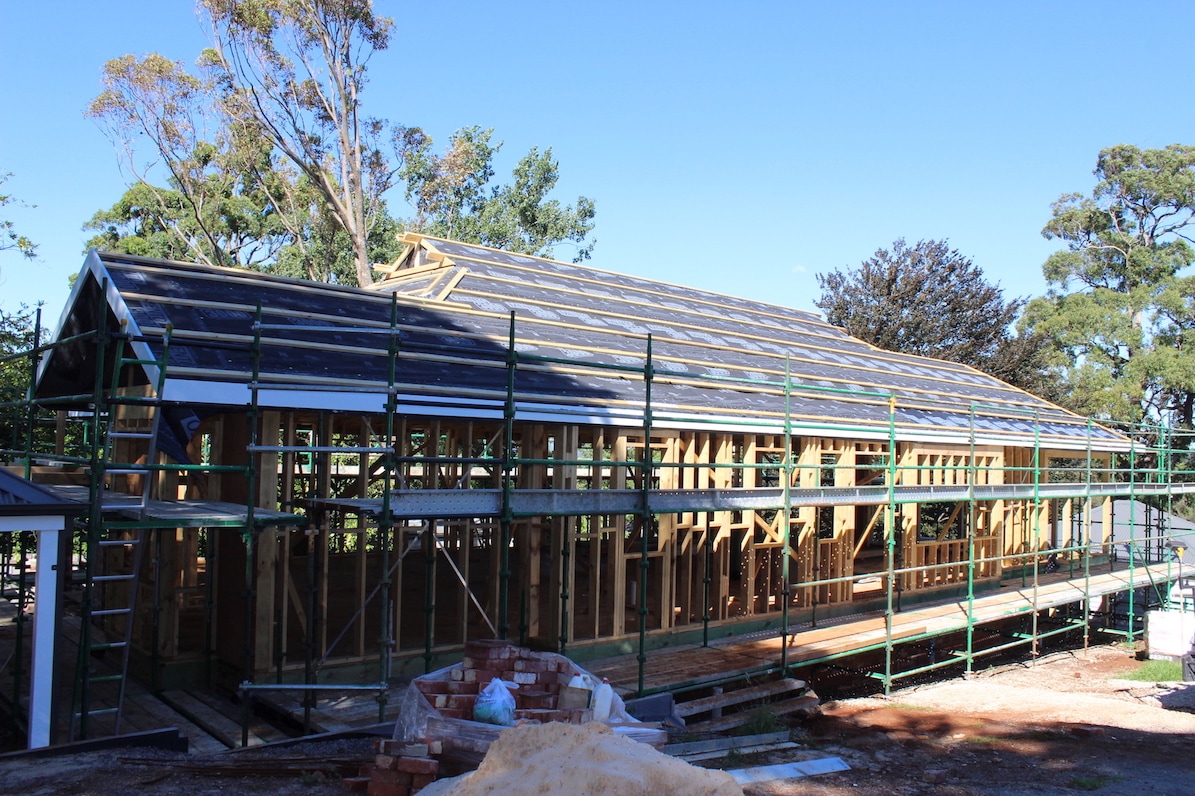
When building we had the fireplace on a few times, which the trades were pretty happy about, but since moving in over summer we haven't needed to use it but I'm definitely looking forward to winter nights here and am expecting the extra effort and stress it caused to all be forgotten. It's a wrap on a few fronts for us, our house is now officially Passive House standard air tight as we have finished the internal air tight wrap. It's a wrap on the finishing of the outside of the house, there are still bits and pieces to do but otherwise we think the house has come up a treat. Lastly, it is also a wrap and pack up of extension cords, tools and radios as the team head off to other jobs for the next few weeks. To begin with in the last 6 weeks the windows were installed and taped to the external wrap, 'picture frames' built around this which hid the tape and finished the traditional look of the house. All the weatherboards and pine lined eaves have been completed and painted. The front door we bought from Paarhammer was also installed. The great thing about the door was that Paarhammer can also do RAL colours (which is what the windows from German came in) so the door frame was able to match perfectly to the window frames. 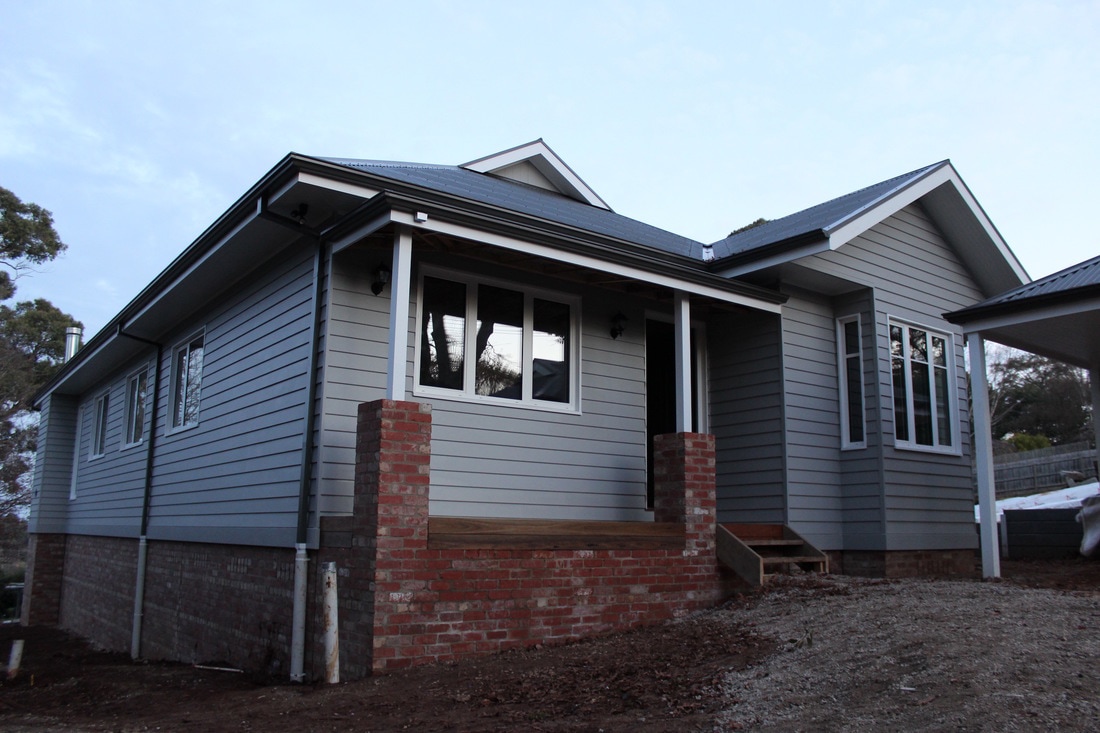
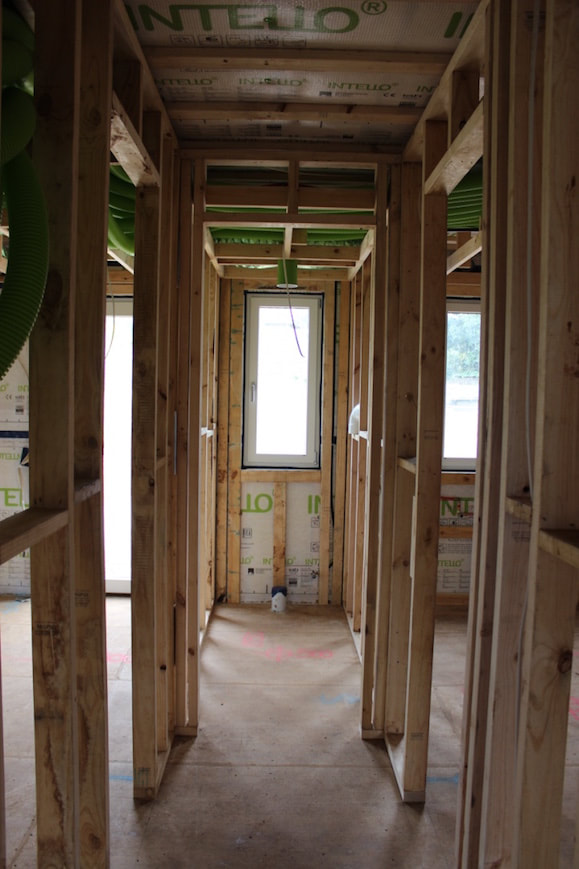
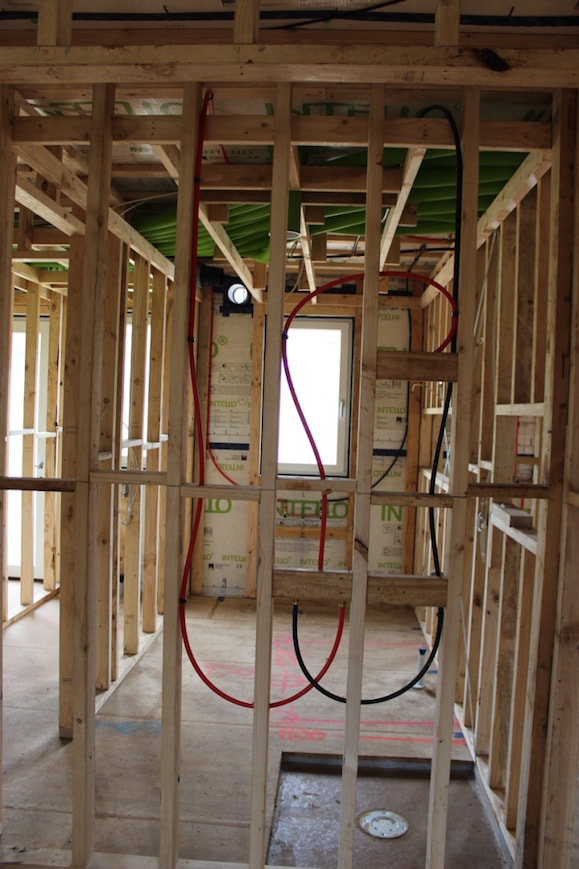
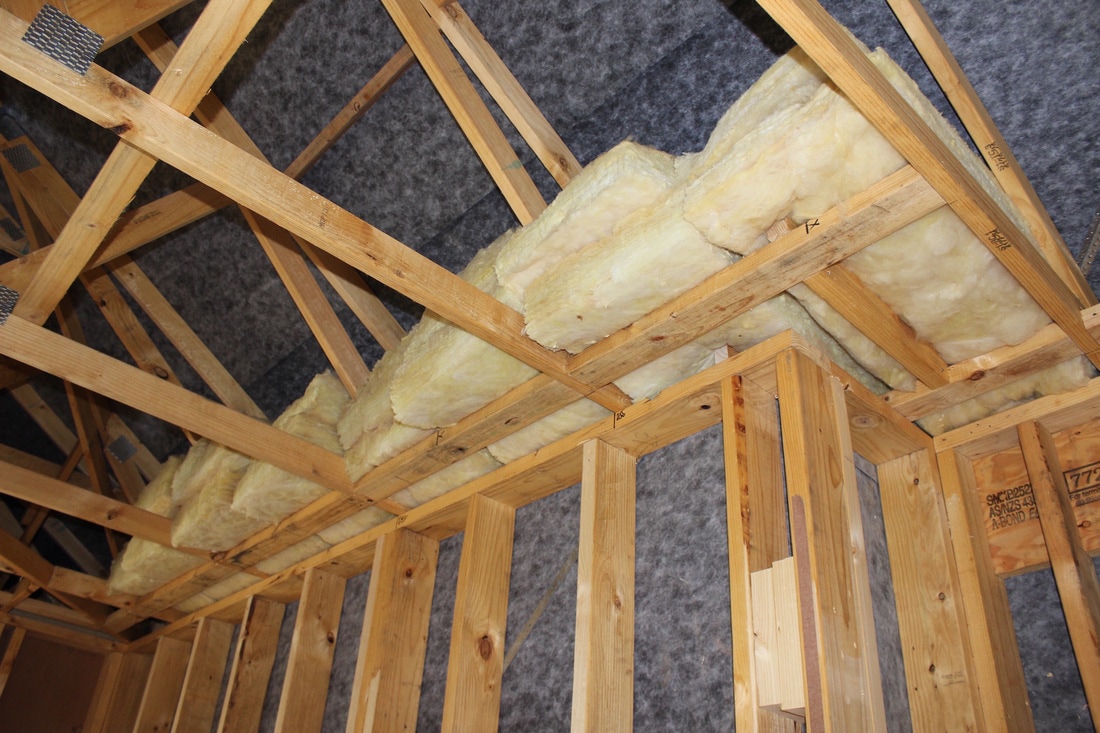
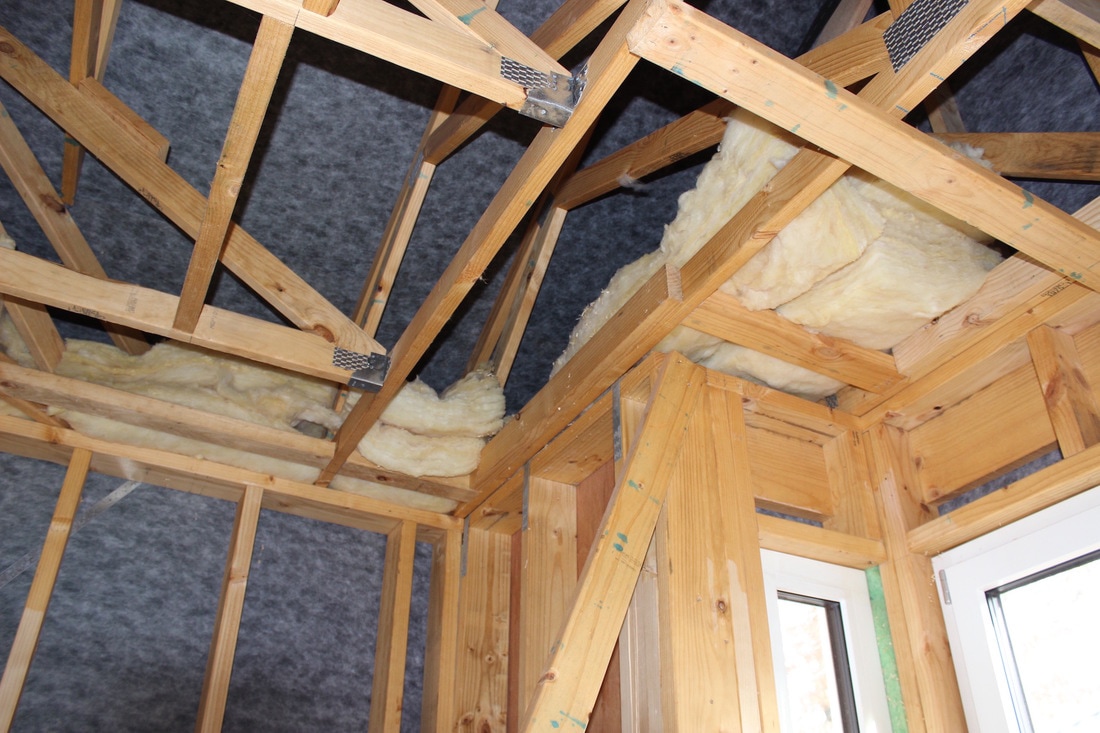
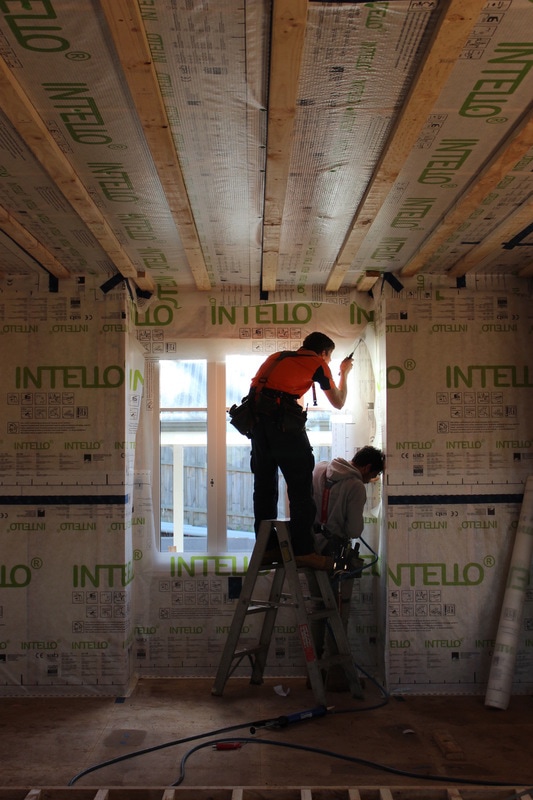
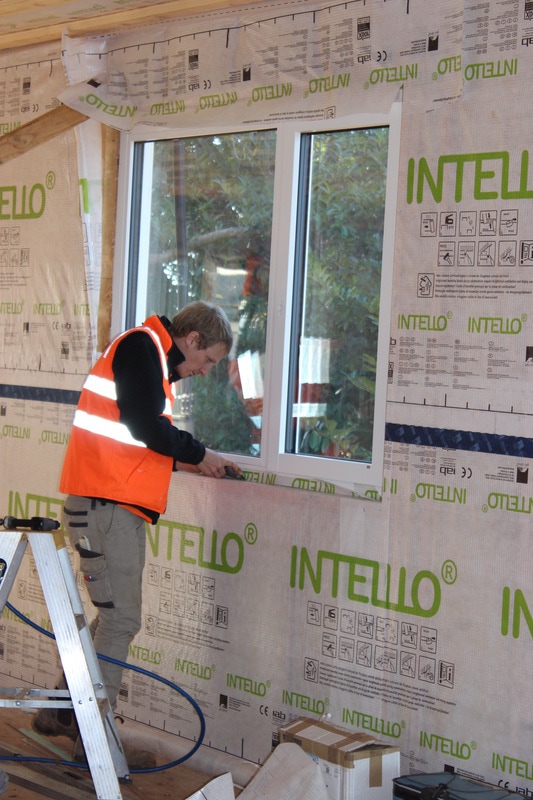
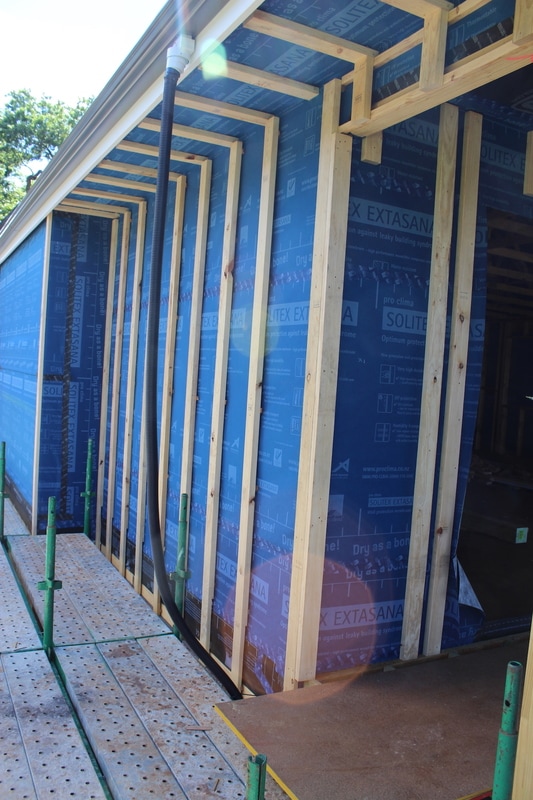
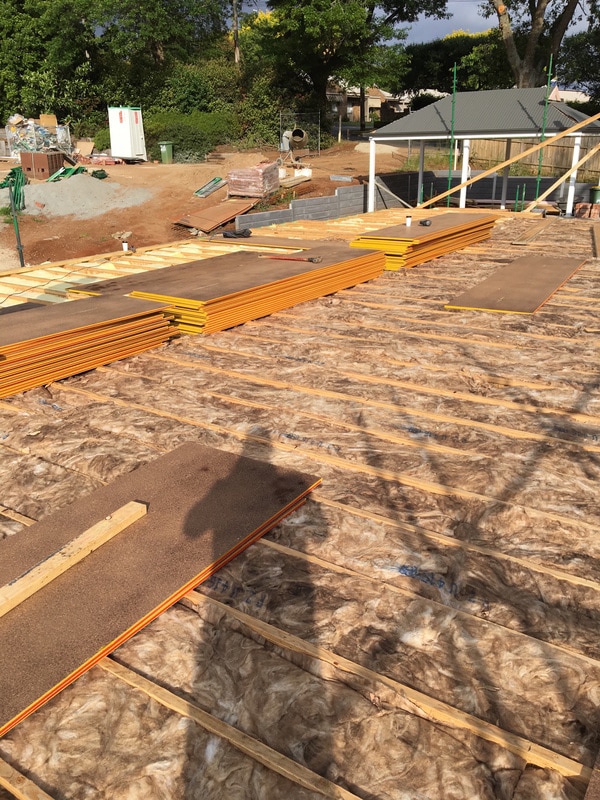
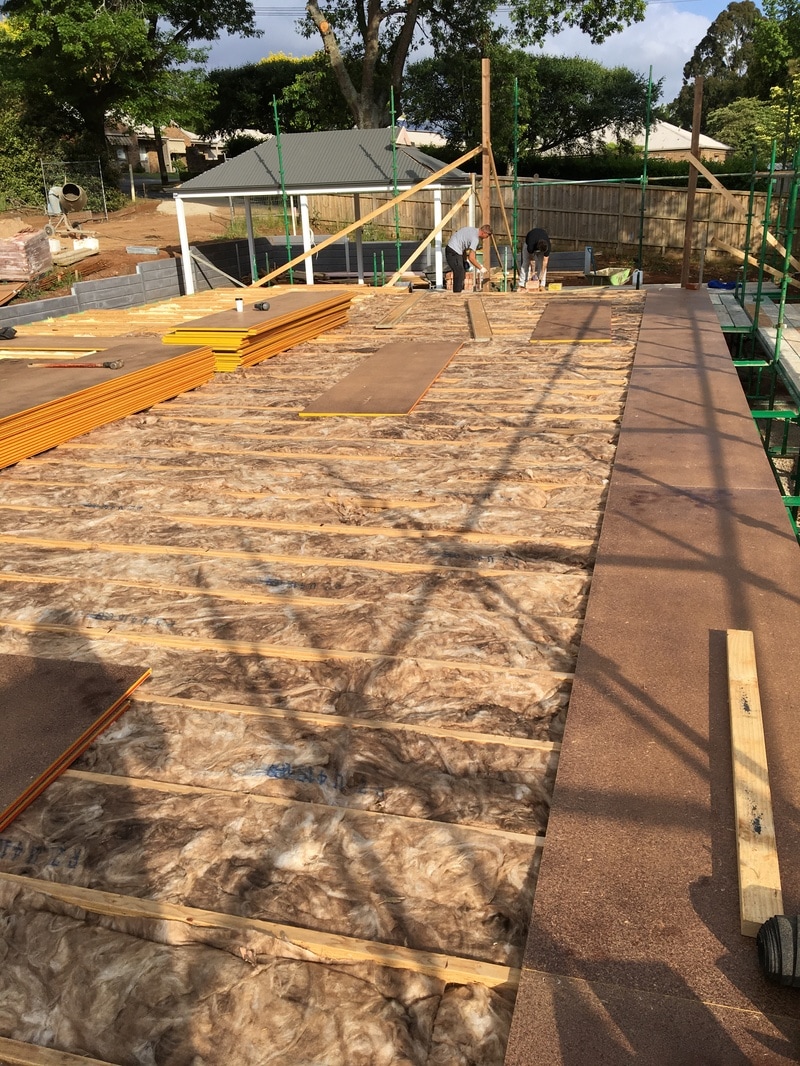
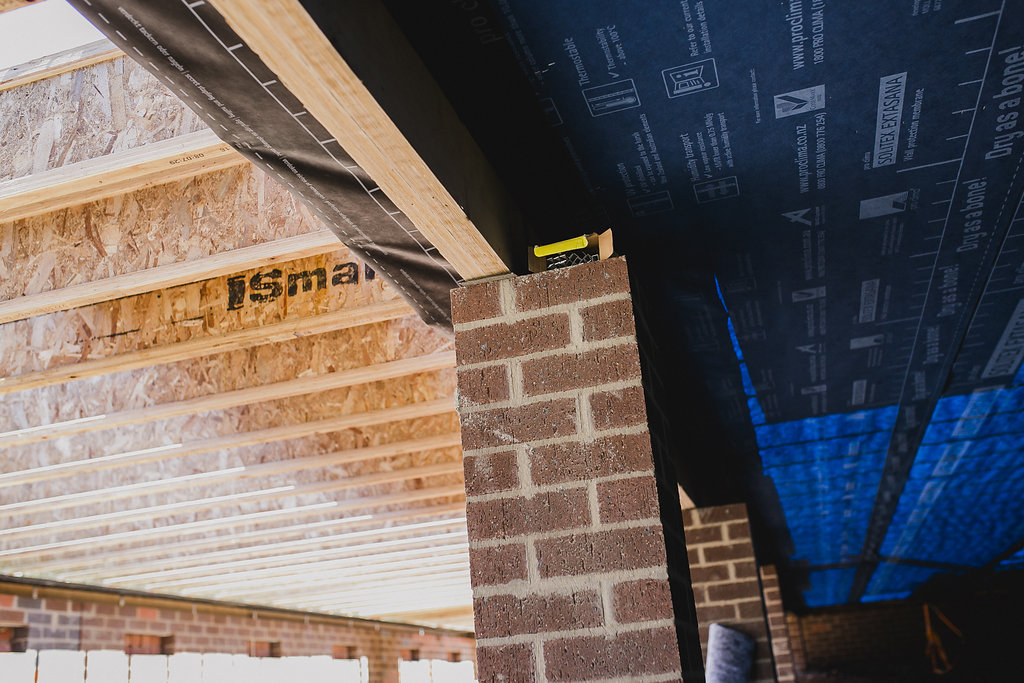
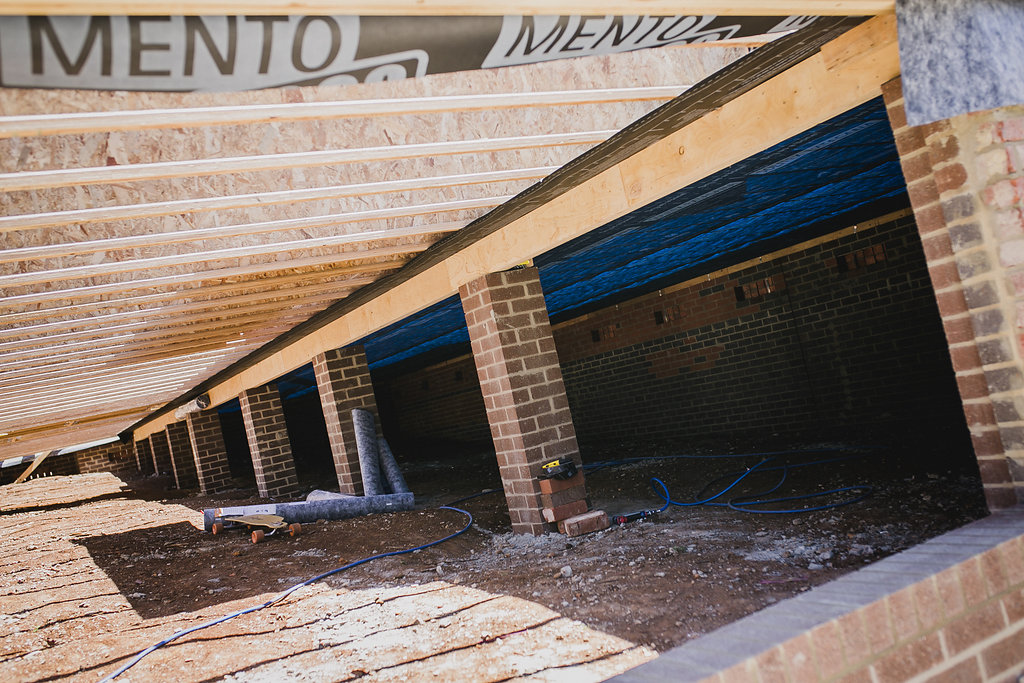
Next on the inside, the all important air tight wrap begun. Starting with the ceiling, the insulation was installed in the overhung section of the trusses. This is vitally important to make sure there are no thermal bridges. I've mentioned in the previous post, that I like to think of the insulation as a big warm feather down jacket. A thermal bridge in a house is like a feather down jacket with the zip open. Even less extreme a thermal bridge can be the difference between a thermal jacket with an exposed zip and a jacket that has the zip covered by an extra flap and buttons over the top of it. You can feel the cold air passing through the zip not covered compared to the one that has the extra layer of insulation over the top of it. Similarly for the passive house Devin had already planned how he was going to make sure that any joins between the wall frames and roof trusses were insulated to avoid thermal bridges. 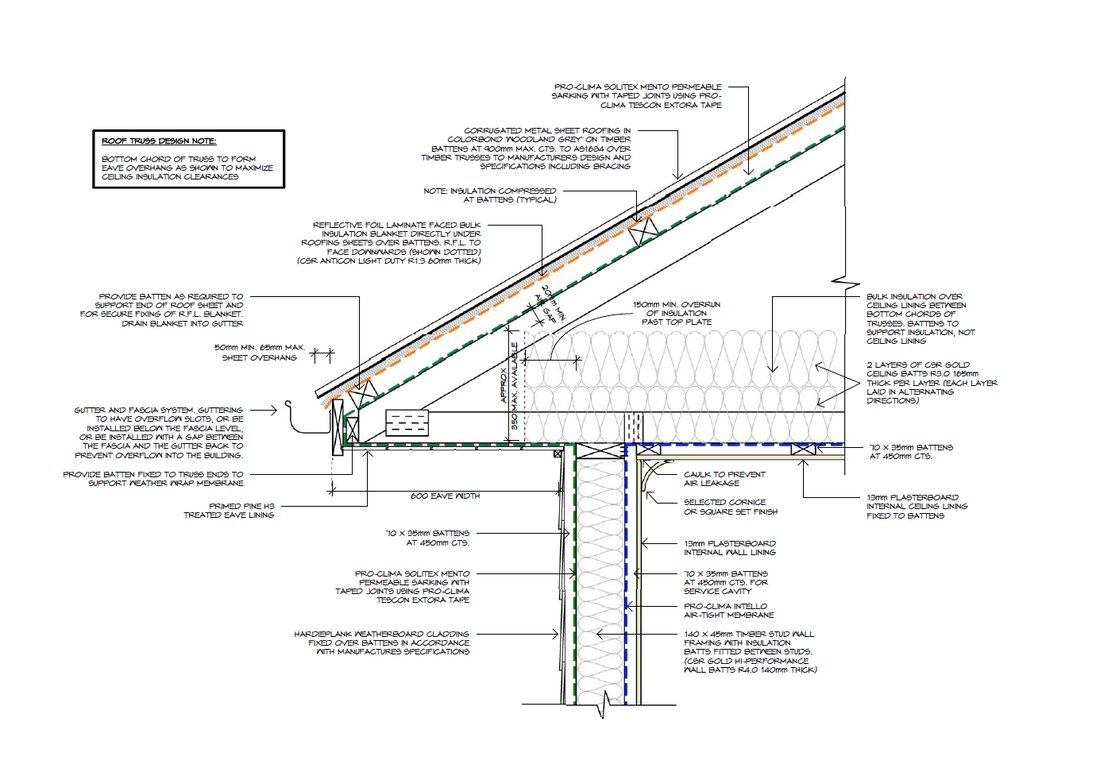 The above drawing section illustrated how the insulation worked in the roof space and the blue dotted line is the air tight wrap. The beauty of having no internal walls up was evident when the guys installed the air tight wrap to the ceiling, there were no wall junctions to navigate making it a quicker and more effective process. Timber battens were installed over the top of the wrap, again to act as a service cavity and for the plaster to be installed onto. 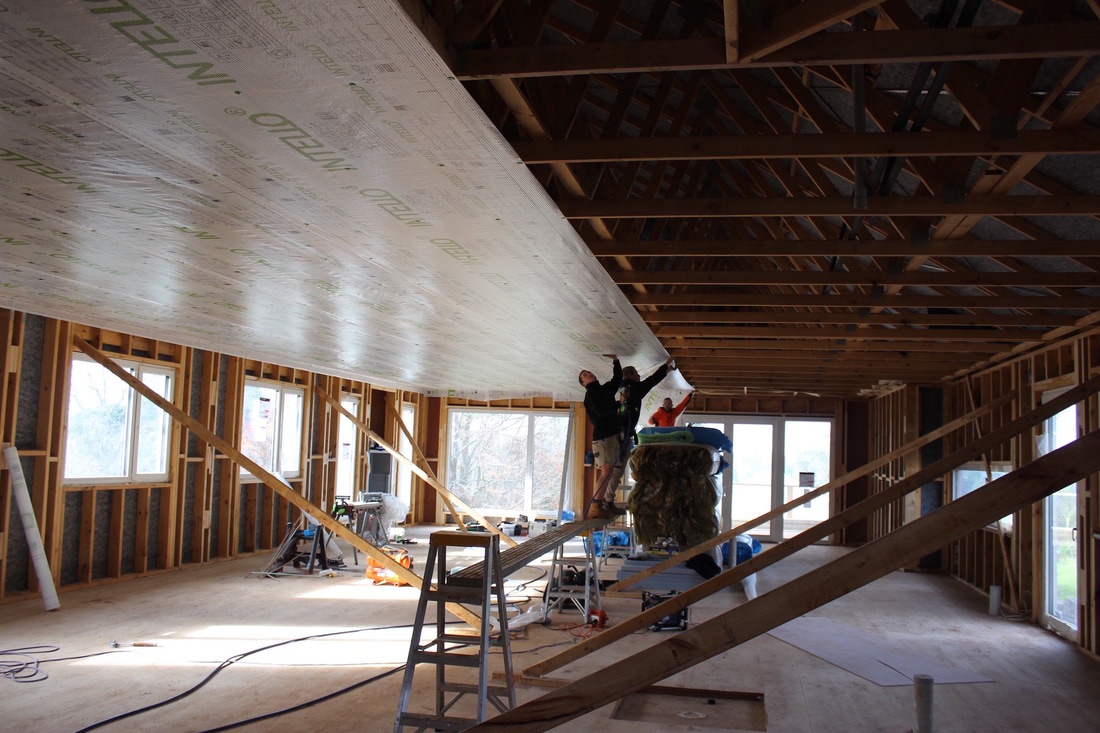 Next the walls, the insulation of R4 high performance batts took up the full 140mm space of the timber stud walls. The combination of the floor, walls and ceiling full of insulation is now what creates the beautiful thermal envelope. The air tight wrap on the walls was installed, around the windows an insulating expanding foam was used to make sure that the space between the frame and the windows were fully sealed, as this is another key area in which thermal bridges can occur There are of course a few penetrations through the envelope including plumbing pipes, the ventilation system outlets and electrical cable conduits. At each of these, specific ProClima seals were used so there are no gaps for air leakage around them. Devin even got a custom made man hole which is made with door seals and a spring latch to minimise air leakages through this area. 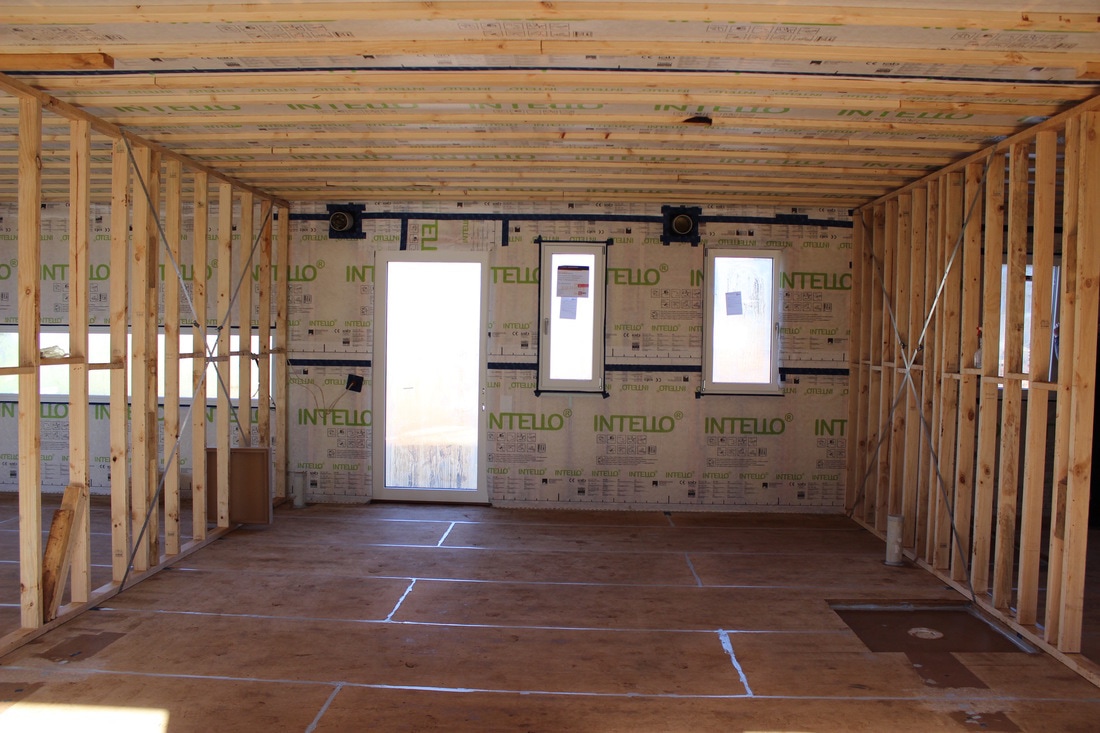 The taping of the wrap to the window frames was one of the most tedious and labour intensive jobs on the house, however the saying good things take time comes to mind as the taping is crucial to achieve the air tightness required. We also used Orcon by Pro Clima to seal the wrap to the yellow tongue flooring. 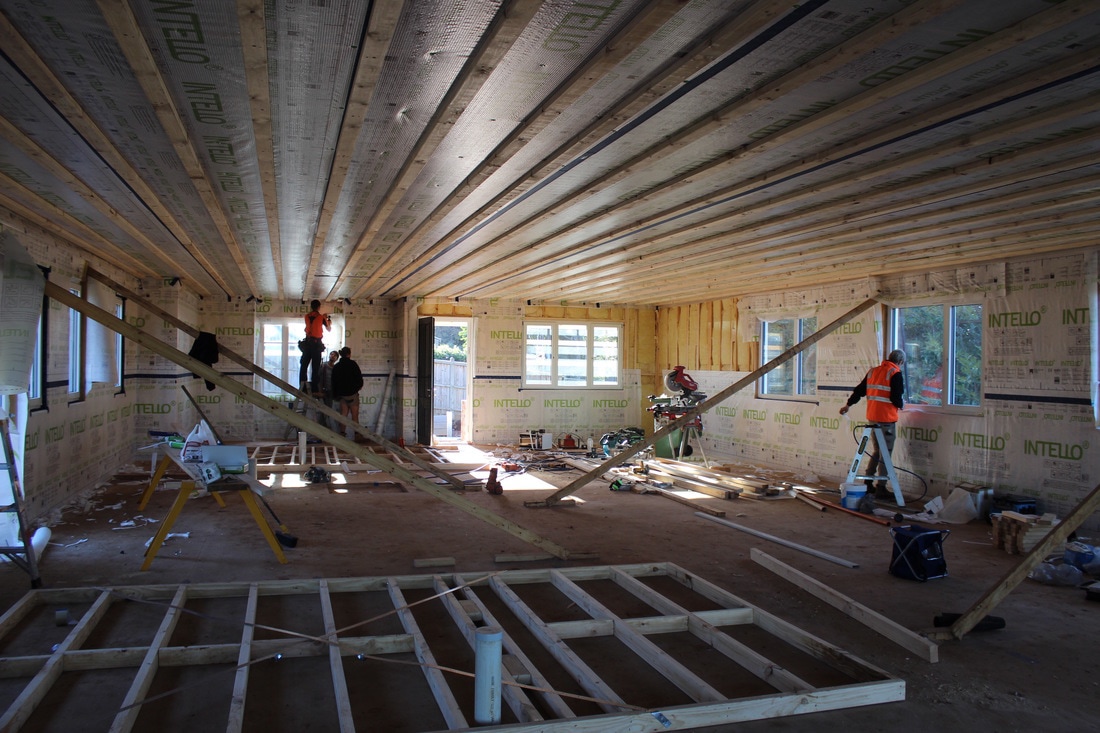
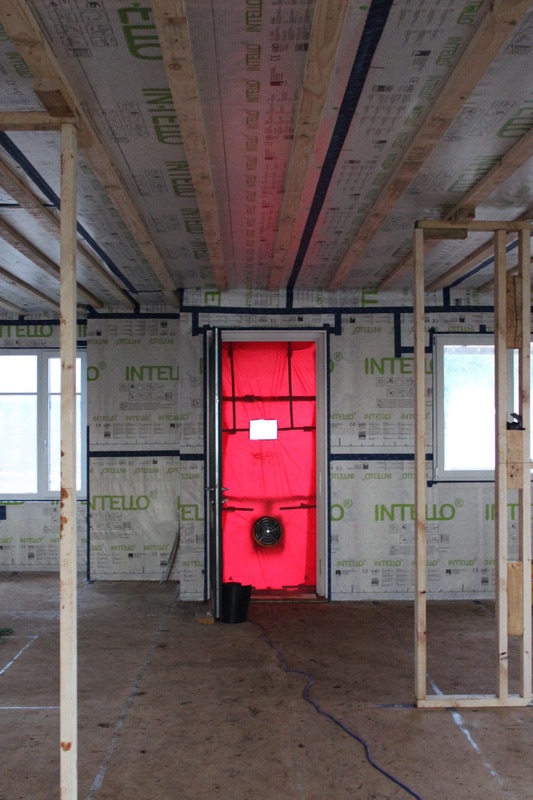
Lastly, all the joins in the flooring were filled with polyurethane to seal any air leaks. We have also been able to put up some internal walls now that the air tight wrap is complete. so it is starting to feel like a home. 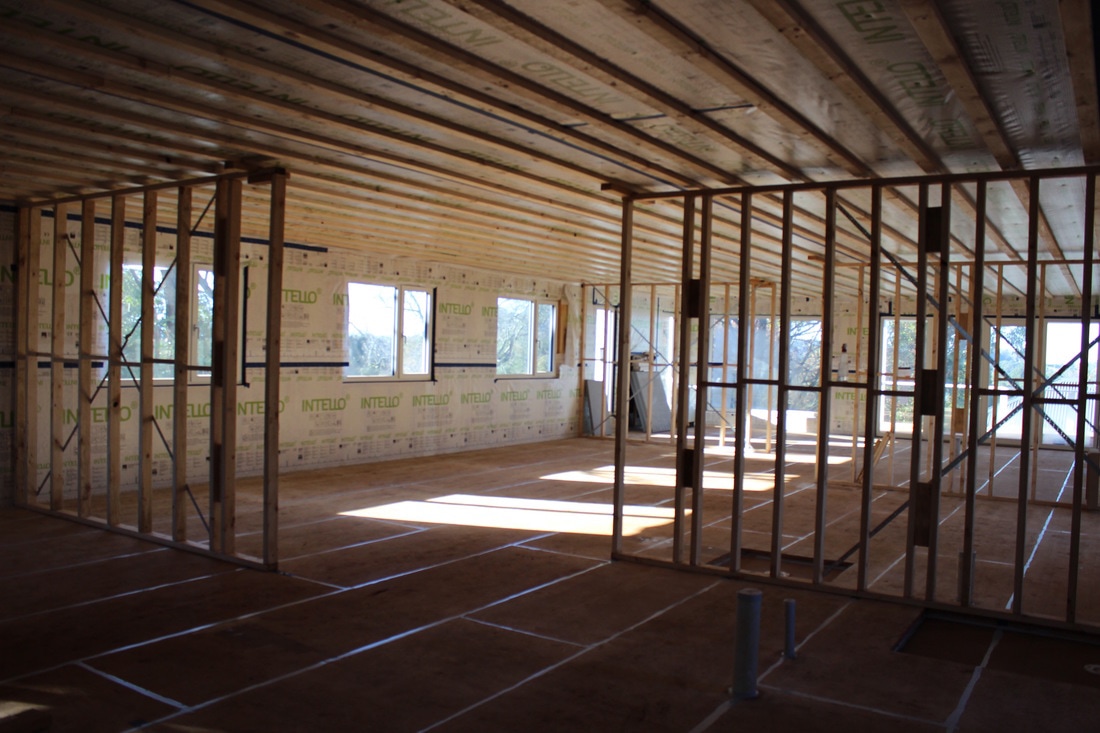 Just yesterday we had our first blower door test! There were a few nervous guys onsite who had spent the last 2 weeks with tape, wrap and seals as best friends. Devin even had a nightmare the night before the test, that he couldn't find anymore tape onsite to fix some air leaks, he woke up with his bedside table all emptied out trying to look for the tape in his sleep! To achieve Passive House certification the house cannot have more than 0.6 air changes per hour (ACH). To help me visualise this, a passive house of this size (20 squares) cannot let more combined air out than the size of a business card. A standard new 6 star energy house could have between 10.0 -20.0 ACH, which would be like leaving the front door open with the amount of air continually escaping/changing in the house. Joseph from Efficiency Matrix conducted the test, in which he uses a tent like seal with a fan in it on the front door frame, a blue hose laid out inside to measure pressure and a computer program. The house is pumped full of air, so much so that we could could see the wrap pushed back against the wall frames and trusses. It turns out that Devin's bad dream was just that, because on the first test we achieved .36 ACH. Certification here we come! 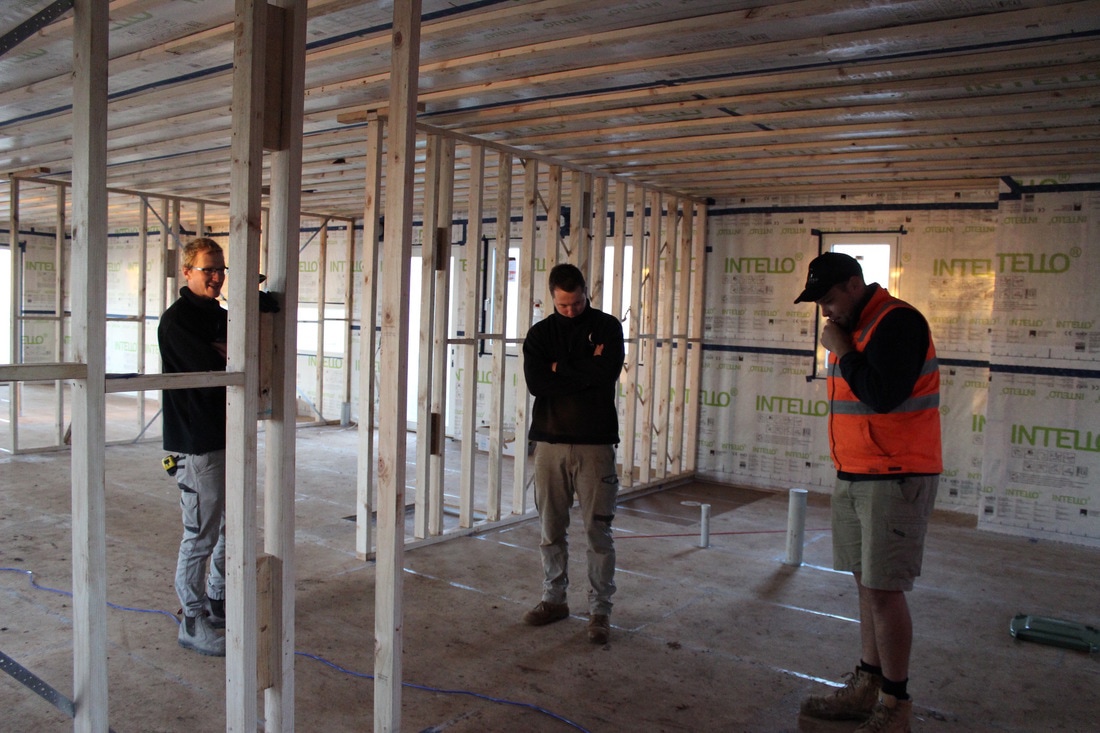
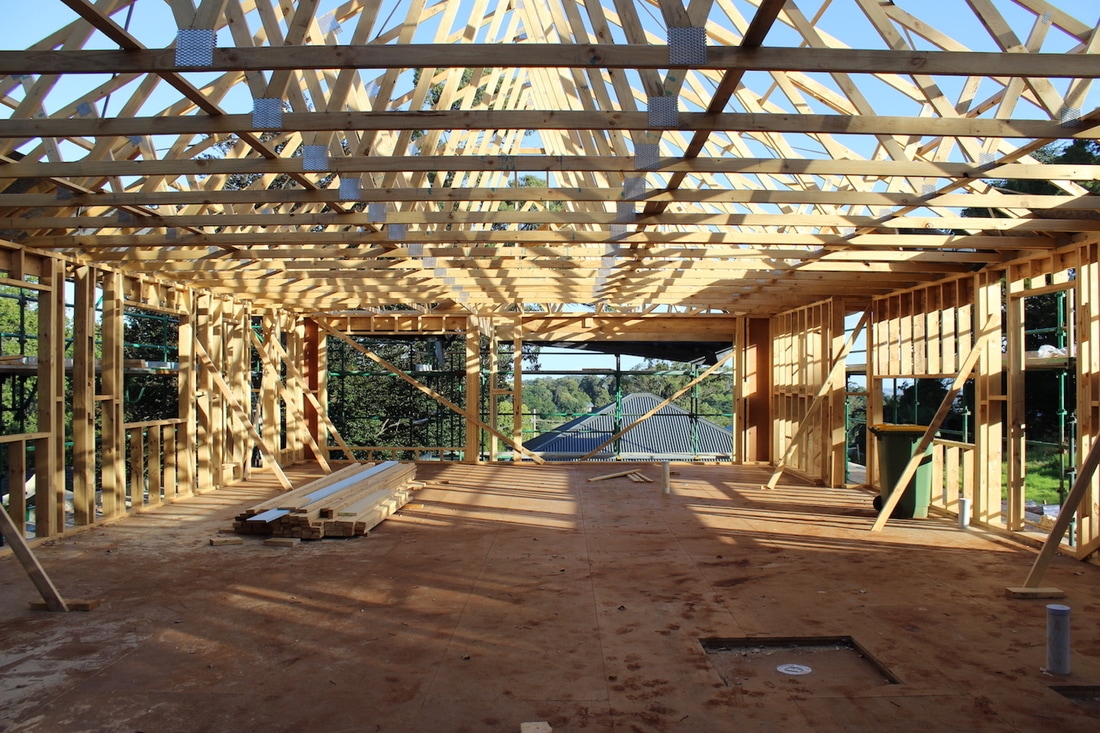
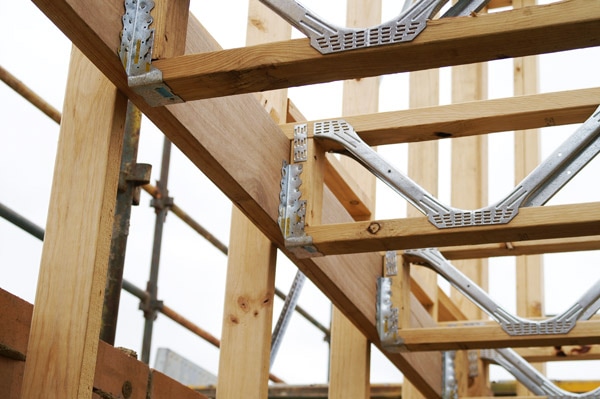
 During the pressure test, you can see the wrap being pressed up against the roof trusses The frames are up! I am sure I join a chorus of builders wives when I say that your own home is always at the bottom of the list of priorities amongst all the other projects. Nevertheless we have made progress and it has been very exciting to see the walls of the house being built. The external wall frames are 140mm thick versus the standard 90mm studs used on most homes, this meant that the frames were built onsite rather than pre-fabricated. We need the frames to be this thick to fit all the insulation required later down the track. We are also only building the external walls at this stage, this is so that when we come to the internal wrap we will have no wall junctions to navigate. I will explain this further when we are up-to that stage. Next, the roof trusses were installed, these were pre-frabricated and therefore nice and quick to put together. Now onto our weather tight wrap, which is the first step in making a sealed building envelope. In my mind the way I like to think about the building envelope is to equate it to clothing we would wear. So working from the outside-in the weather tight wrap is like a raincoat/wind breaker. The insulation is the warm down jacket and the internal air tight wrap are the thermals. We are effectively creating what I call a house onesie, but I will explain more about the thermal envelope in future blogs. In the below cross-section you can see that the weather tight wrap is the green dotted line. 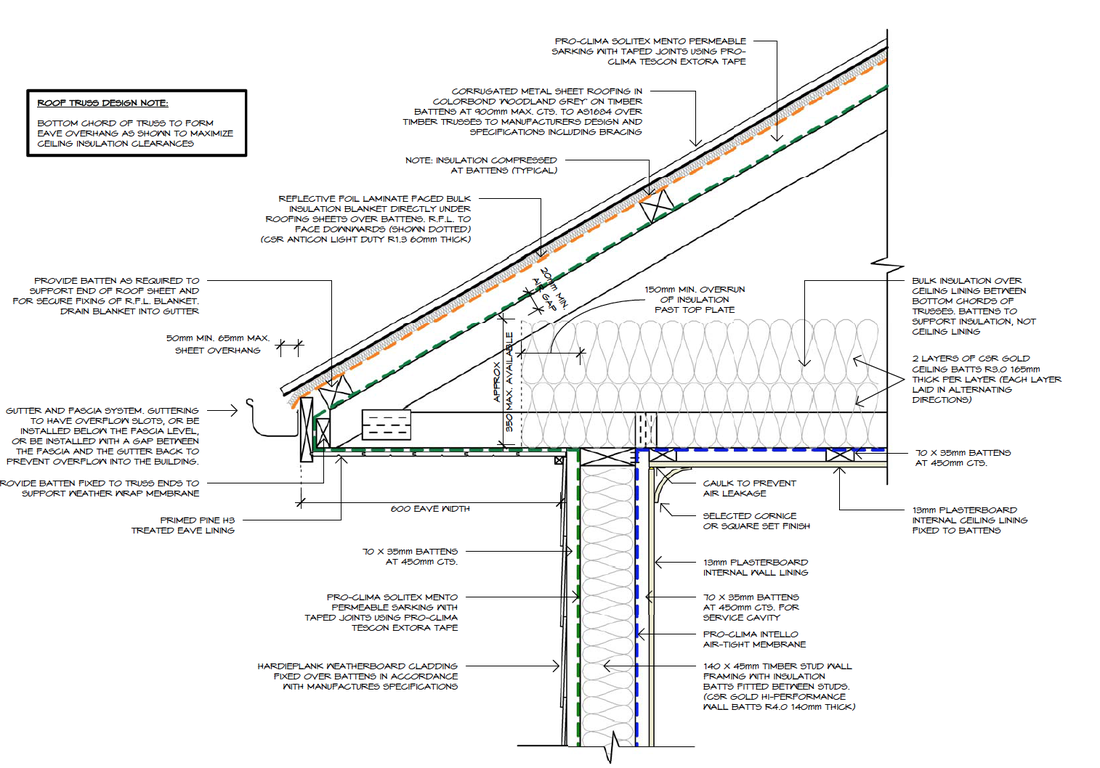 On the roof trusses we used Pro-Clima Solitex Mento. As you can see from the photos this was installed on the external side of the roof trusses, all the joins in the wrap are taped then timber battens were fixed onto the trusses for the colourbond roof to be layed. 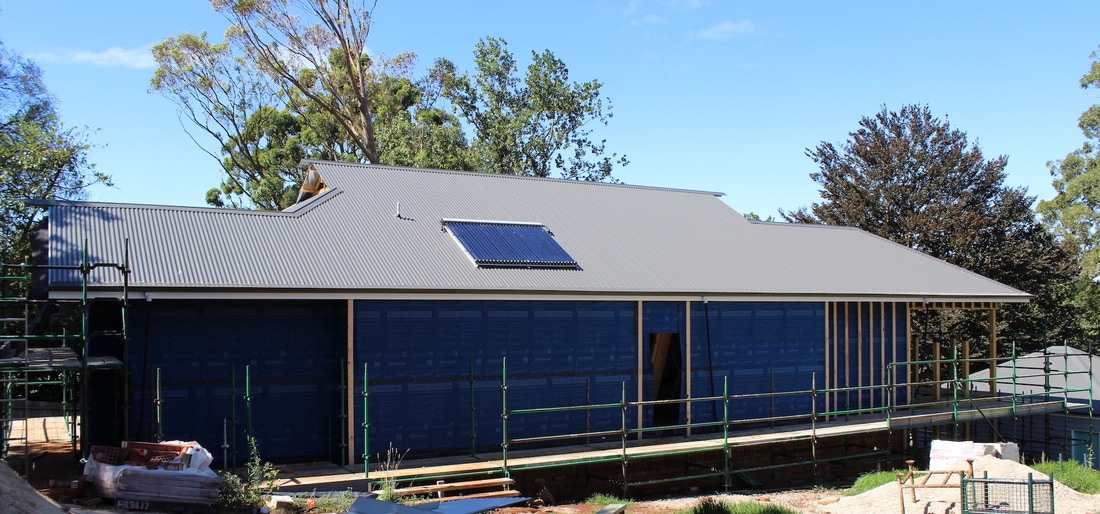 We have begun wrapping the external walls of the house. In a similar fashion to the roof, the walls are also wrapped in Pro-Clima Solitex Extasana with all the joins taped. On this wrap we have started to install all the battens for the weatherboards and pine lining for the eaves will be fixed onto. The battens play a two part role, firstly so the weatherboards can be fixed to them, to keep puncturing the wrap to a minimum. Secondly it is going to act as a 35mm service cavity for things such as electrical and plumbing needs (i.e. electrical cable, hot and cold water supply, green recycled water supply from the water tanks and cable needed for the electrical solar system). The service cavity is there so we are not taking up space in the wall frames with these services and to keep the wall insulation consistent. You can see in the photos how the black wrap that is under the floor, has come up over the floor joists to overlap the wall wrap. At this stage we have also gone straight over most of the window openings with the wrap, this is so we can cut it back later and make sure there is enough wrap to tape correctly to the windows. 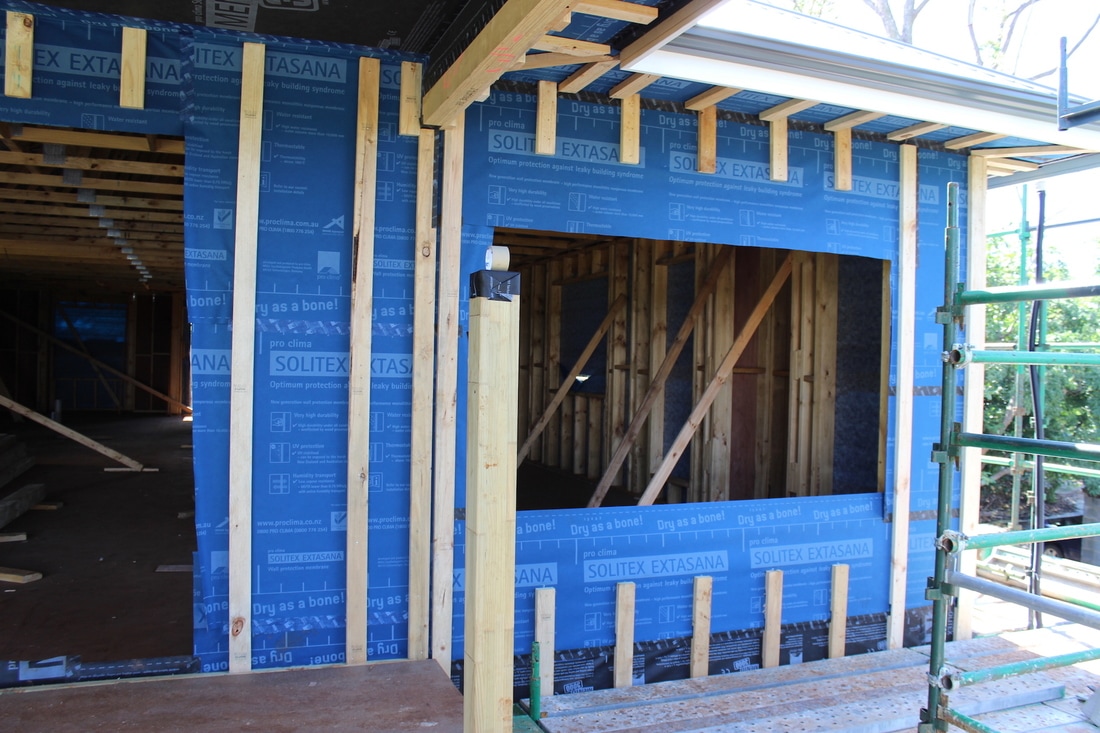 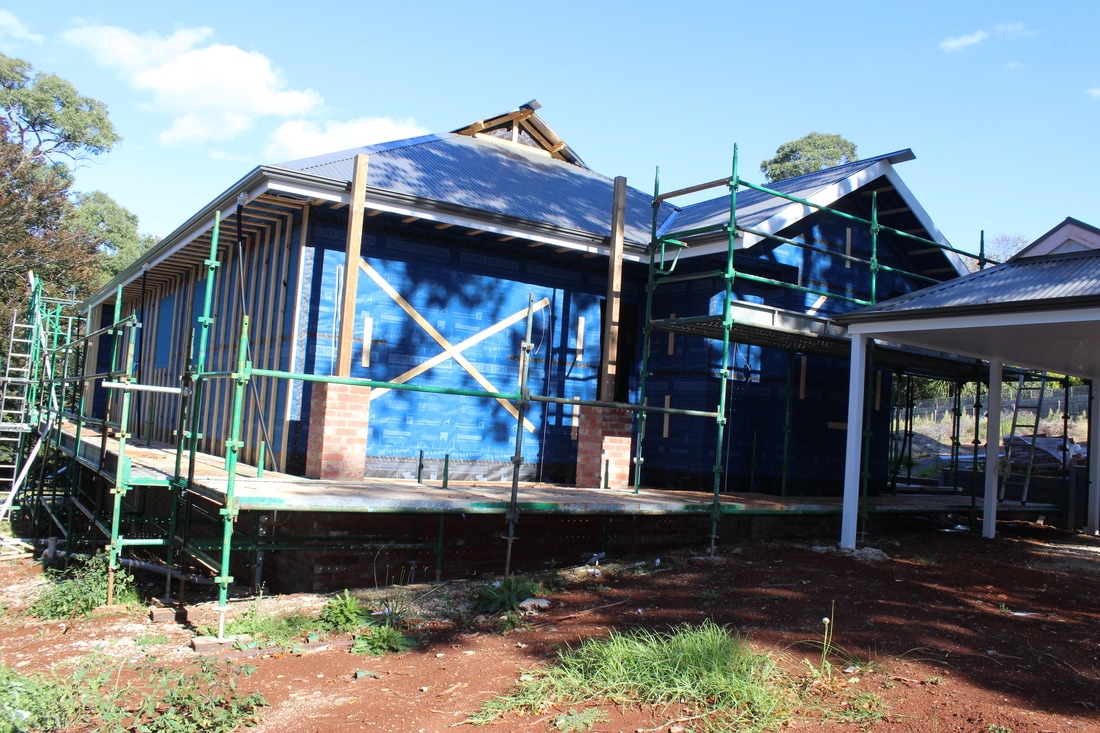 Devin has promised me that our house will be moving up the priority list now so I will be able to post new blogs very soon!
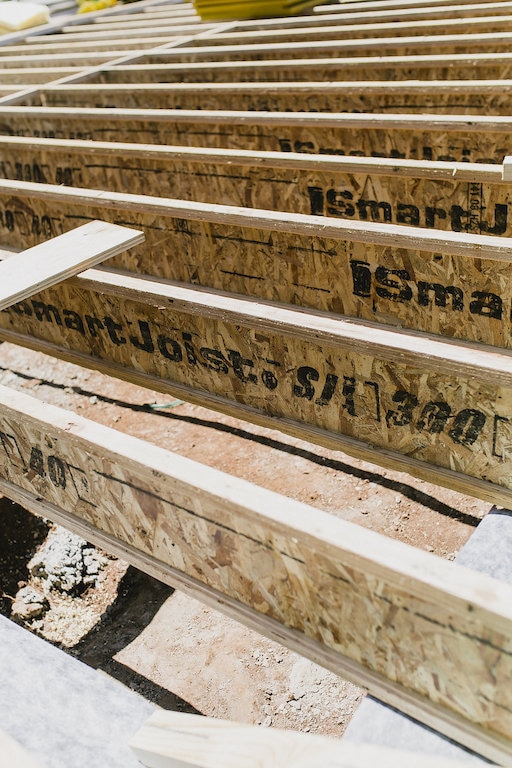
Our Passive House has risen up out of the ground and we now have a very well insulated, wind tight sub-floor to walk on. Due to the slope of the block and to capture the views our floor was built on a brick subfloor. We used nearly 10,000 bricks as the subfloor is double brick, using recycled red bricks from EcoGroup on the outside skin with every 6th course an 'engaged/half' brick to give a bit more character. We used second bricks for the iniside skin and for the piers down the middle of the house as theses are not seen. We are very happy with the results and it was well worth the wait. 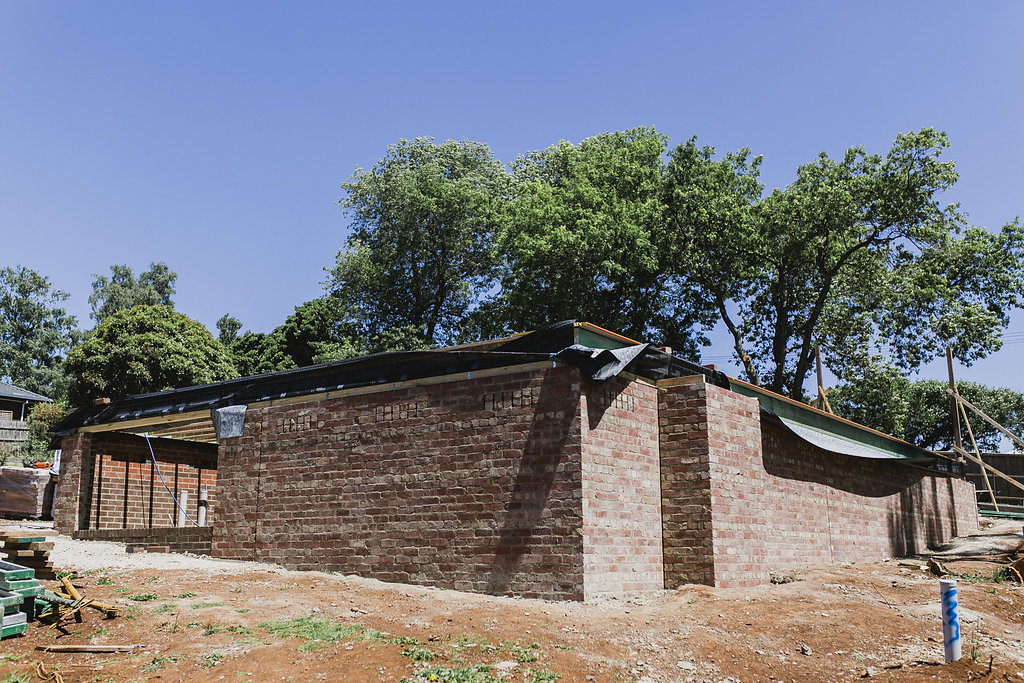 Now we can finally start with some Passive House elements! The first Passive House detail to consider is the type of floor joists. To complete the sub floor, Devin used 'smart joists', which are made from engineered timber to span across the width of the house. He wanted to use the smart joists for 2 primary reasons: 1. The depth of the joists are 300mm enabling enough space for our insulation 2. There is no metal webbing which could restrict and leave potential gaps the insulation Below are photos of 3 methods of building a subfloor. On the left is a metal webbed posi truss, as you can it would be tedious to put the insulation in between the metal webs and therefore it would be more likely that there would be gaps in the insulation. In the middle is an example of a 90mm joist sitting on a bearer. This would have not given us enough room to fit all the insulation we need. On the right is a photo of the smart joists at our house. This is the best design for us as it allows the insulation to be laid uninhibited by steel webbing, and gave us enough depth to pack it full of insulation. As per our Passive House assessment, to achieve certification we needed an insulation value of R6.0 An R-Value tells us how well a material resists or allows heat to flow through it. The higher the R-Value the less it lets the heat pass through it (i.e. the better at insulating an area it is). We installed 3 insulation batts, 2 x R3.0-value and an additional layer of R2.0 ( because we had the space left in the joists and there is no negative impact by having more). This gave us a total insulation value of R8.0. In comparison a 6 star energy rated new home would only need an R-value of 1.5. Of all the elements of a Passive House, better insulation is one of the easiest and most cost effective to achieve. Every new house already has to include insulation, so this is not a new element to the construction unlike the air tightness element. Also it is not that much more expensive to bulk up the insulation, provided you have the space in the walls, floor and roof to do so. 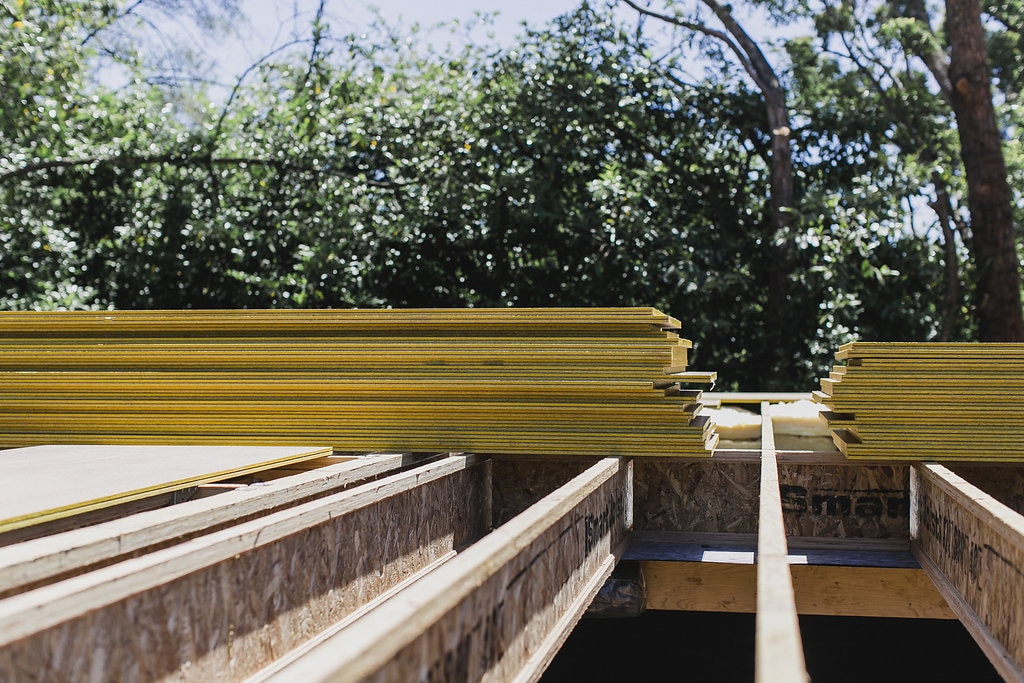 The final component of the sub floor is the wind and air tightness I once heard someone say that Australian houses are like glorified tents with the amount of drafts and air that passes through them. One of the criteria to achieve a Passive House is that the house needs to be air tight and this is no small feat. I'll explain more about achieving airtightness in a later post, however for now my analogy would be that we need to have no more than the air in a ping pong ball escape the house, compared to the average Australian home releasing the amount of air that would be held in a hot air balloon. Because our house is sitting on a sub-floor, we have a dual pronged approach to achieve air-tightness in the floor. We have a 'wind-tight' wrap under the joists and then an 'air-tight' layer which will be the red-tongue flooring (a commercial grade of the more commonly used yellow-tongue flooring) on top of the joist. The wind tight wrap and the tape used to tape up the joins is from Pro Clima. In the below section drawing of the floor, the green dotted line represents our wind tight layer, wrapping under the joists and the air tight layer is the red-tongue flooring. 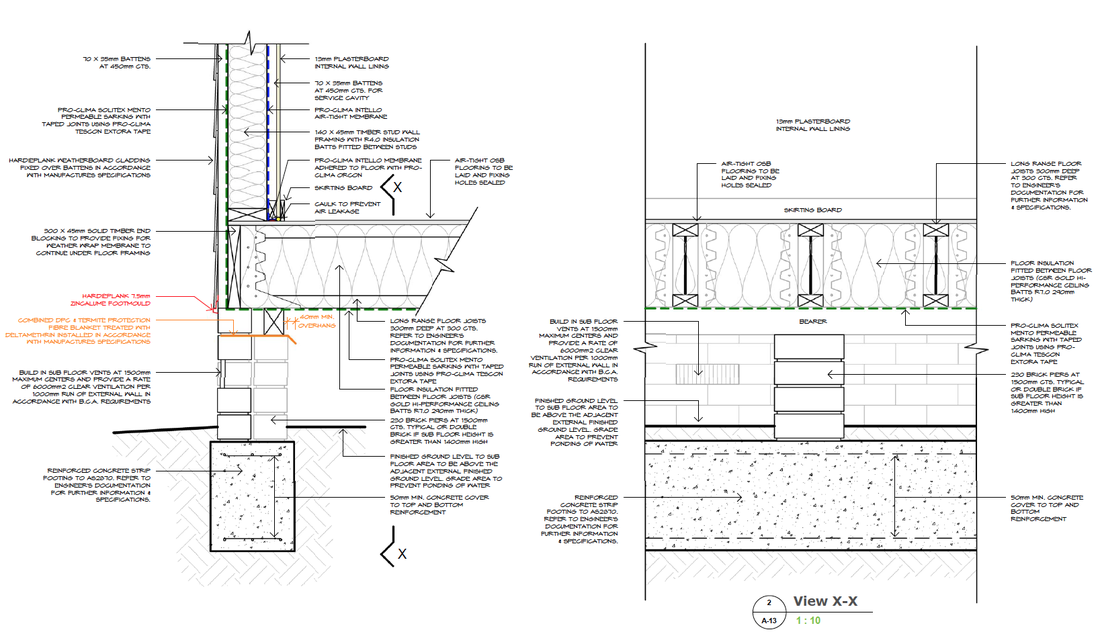 In the below photos you can see the drawings come to life. When we come to getting the house pressure tested to find out how air tight it is, all of the joins and nail holes in the red tongue floor will be taped up. 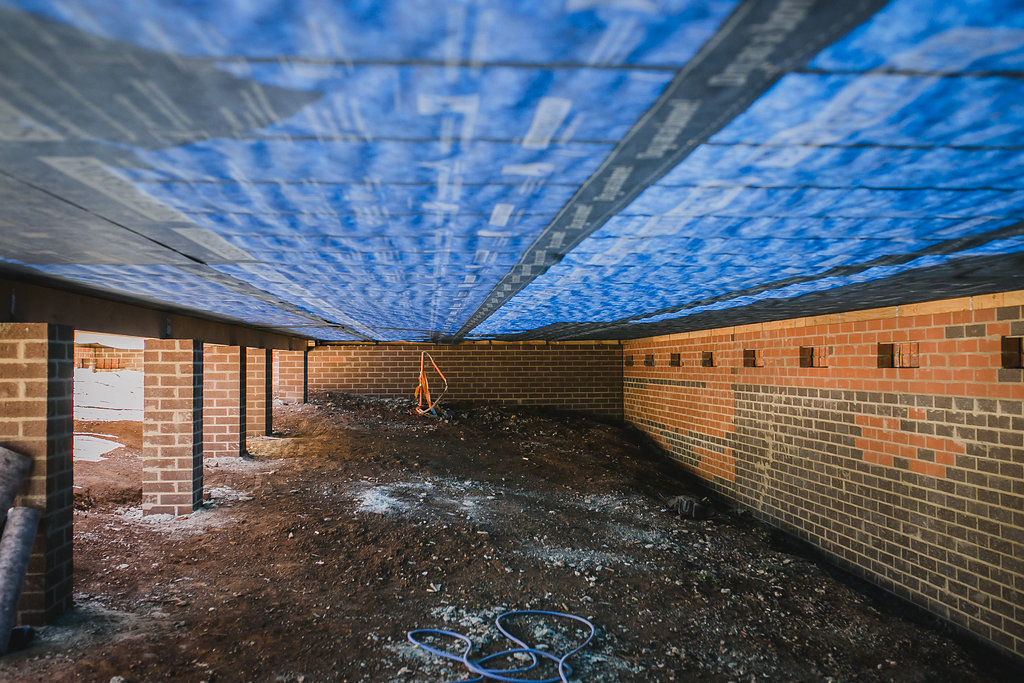 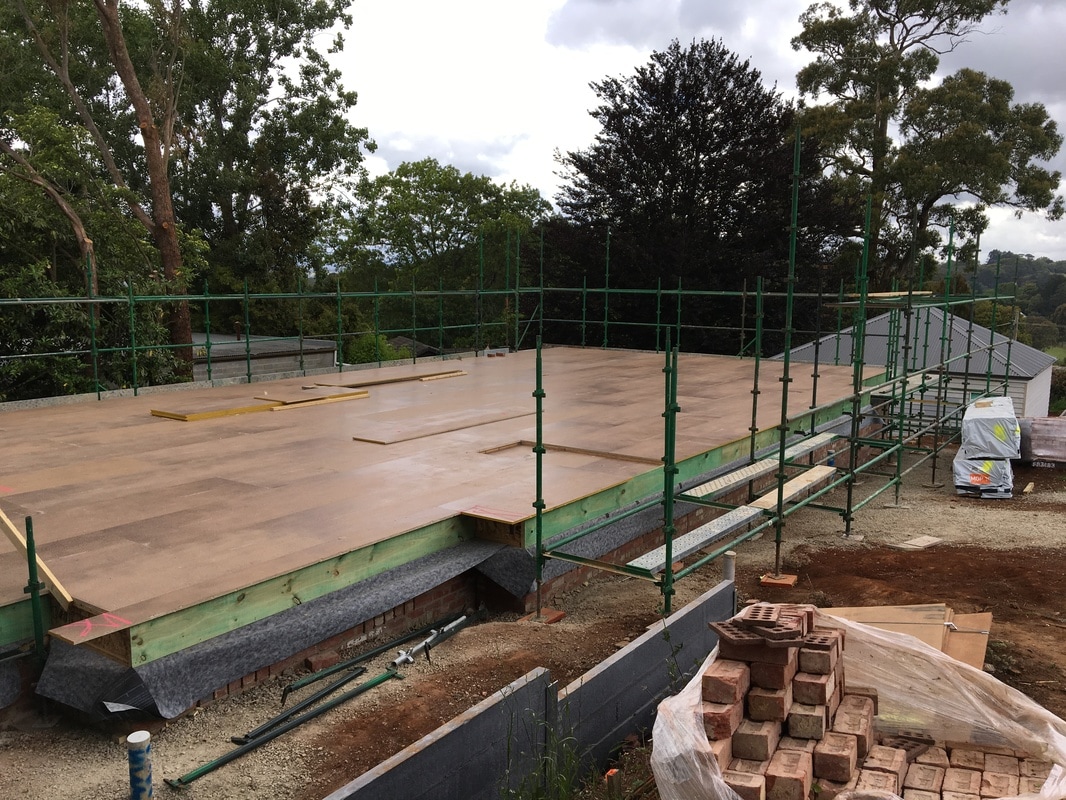 Well, it has been a busy few weeks for us onsite getting the site works, underground services and foundations completed. This has all been business as usual. So far there has been nothing to date that has required any Passive House specific elements. Devin thoroughly enjoys the site works stage in this building process. It is often the area that has the most amount of uncertainty, fortunately this time it has all gone as smoothly as possible for us. Windows are one of the critical elements in a Passive House and is typically where the most heat and energy is lost in a home. There are three main performance areas for a window in a Passive House: 1. U -Value 2. SHGC Value (Solar Heat Gain Co-efficient) 3. Airtightness - unique to Passive House Once we had the first draft of plans and the Passive House assessment, we had a very specific performance target that the windows had to achieve in order to obtain Passive House certification.
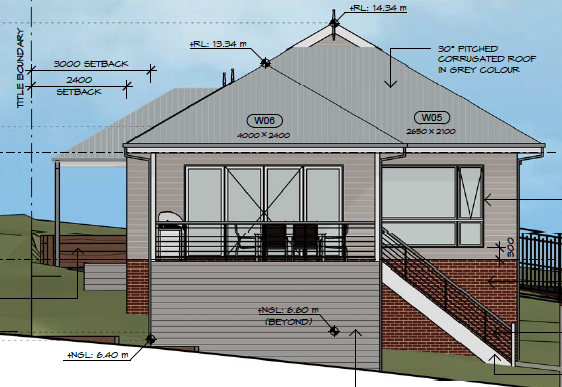
These values are often thrown around when looking at buildings and energy ratings, but myself included never really understood what they mean. The U- Value measures how well the 'whole window' (including frame, glass, seals and spacers) prevents heat from escaping. U-Values generally fall between 2.0 - 10.0 for Australian products. The lower the U-Value the greater the windows resistance to keeping out the heat or cold. When we were making preliminary phone calls to some of the major window manufacturers and told them what u-value we needed to achieve they would almost have a little chuckle to themselves thinking we were joking! The problem most of the Australian manufactures we contacted had with achieving the u-value, was that they could achieve the u-value with the glass alone, but it was the frame that would let down their efficiency. The SHGC value measures how much solar radiation passes through the window, it will be a number between 0 and 1. The lower the SHGC, the less solar heat it transmits. In a cooler climate such as Melbourne, we want the windows to have a higher SHGC to allow for more heat to pass into the house essentially offering free solar heating for the home. The original designs for the windows were primarily three panes of glass, with two openable sections as you can see from these elevations. After contacting a couple of window manufacturers who were able to meet all 3 of the Passive House criteria, nearly all suggested limiting the amount of frame the windows had in the design. The frame is the major element of the manufacturing that was making the windows more expensive. Taking this into account we decided to keep the front facade the same, as this was important to us to maintain the bay and office window design, but we adjusted most of the other windows to two panes of glass and one openable section With the revised design, we received 5 quotes from different window manufacturers. The quotes ranged from $80,000 to $23,000! Out of these 5 manufacturers, we were confident 3 of these were able to deliver to a Passive House standard from their previous experience and the documentation of the testing they have done to demonstrate the performance of their windows. We decided to go with German manufacturers Unilux Windows, which we were able to source through a fellow certified Passive House tradesperson and supplier of Passive House products in Tasmania, Justin O'Connor from Passive House Construction and Products. The Unilux windows came in two options, u-PVC/Aluminium (slightly cheaper) and Timber/Aluminium. Given the intensity of the UV in Australia we didn't want issues of the u-PVC discolouring or fading, therefore we went for the Timber/Aluminium frames. Performance wise, the windows are triple glazed with an average u-value of 0.8 for the home. If we were to imagine our house to have a standard 6 star energy rating, requiring double glazed windows (even this isn't always required) and aluminium frame, it would cost from a typical Australian manufacturer between $12,000 and $15,000. In comparison the Unilux windows, coming all the way from Germany were just under $38,000 delivered to site! It just goes to demonstrate the lack of demand on the Australian manufactures to lift their game and supply better performing windows.
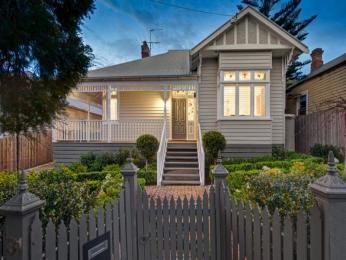
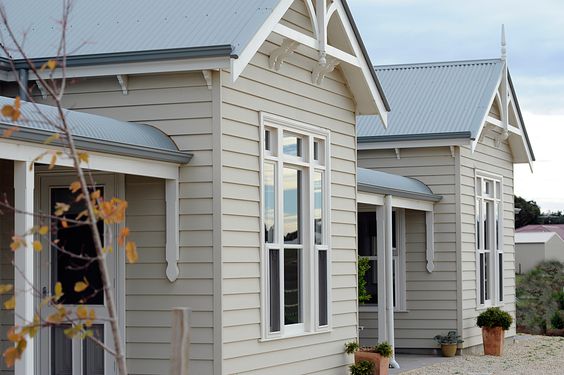
 When designing our house, these were our basics requirements: - House size to be 18-20 'builders' squares (or 162- 180 square meters) - 3 bedrooms - Home office - 2 living areas - Master bedroom with ensuite - Family bathroom with seperate toilet - Detached garage (for Devins work materials and tools) - Detached car port As this is Devin's first construction of a Passive House, to make sure we achieve certification, he wanted to keep the exterior wall layout as simple as possible. Therefore the house is a simple rectangular shape, this is to help minimise thermal bridges (but more on that later) As you can see the main living areas are on the north side of the house, including the home office as we will use this space more than the Master Bedroom. The bathroom, ensuite and laundry are towards the south/west side. 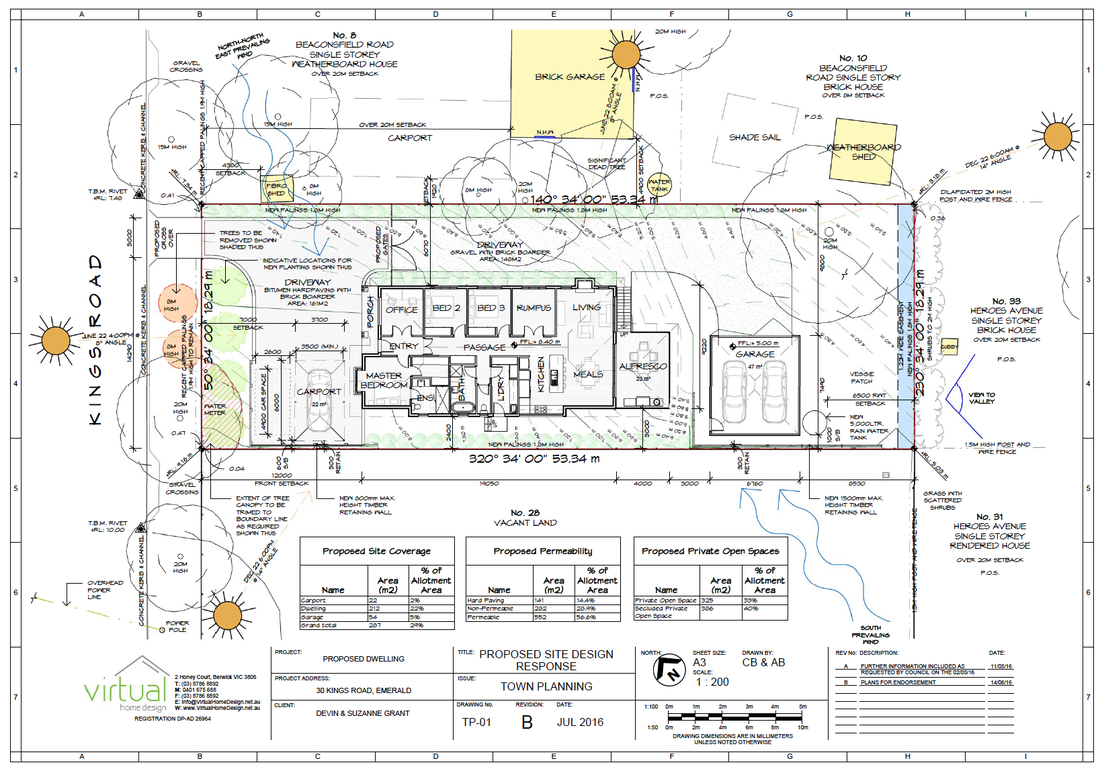 In regards to the size, 18-20 squares for a house is considered on the smaller side in Australia. There were a few reason for this. Firstly, Australia is known to have large homes, 27 squares (243 square meters) which is the average house size. A typical new home these days will boast spare bedrooms for guests or multiple living rooms and formal dining rooms. Personally, Devin and I do not wish to conform to the general mentality that bigger equals better. We don't want to work for the next 30 years to be paying off spare rooms. The second reason for building a smaller house is because we honestly don't know how much extra it is going to cost to build a certified Passive House. We have heard at seminars and from others in the industry that you can expect to pay anywhere from 10-20% more than what any other new '6 star energy' home would cost. In Europe the cited price difference for a Passive House is only a 5% increase in cost. Since Passive House is so new in Australia, there is no demand on Australian manufacturers for products that will comply with the Passive House standard, therefore naturally the products are going to cost more. So ultimately we wanted to make sure we could afford to build it. After Anthony our draftsman had completed the initial drawing concepts, it was over to Clare our Passive House consultant to literally run the numbers. This is done in the Passive House Planning Package (PPHP), which I will not attempt to explain as there is no way I could do it justice. Other than to say that every single detail is calculated and used, from Melbournes climate data, the altitude, what materials are to be used internally and externally on the house right down to how many people will be living in the house and much more. To achieve a certified Passive House there are very strict performance criteria that must be met. At this stage what we are most interested in, is how much the house needs heating and cooling. After all the ultimate goal for a Passive House is to eliminate the need for conventional heating and cooling. Therefore, specifically to be certified as a Passive House, the heating and cooling demand must be equal or less than 15KWh/m2 per year. So what does that mean? The way I like to think about it is that if a Passive House was a person it would need one apple (say 50 calories) a day to run. In comparison a '6 star energy' rating is based off 120KWh/m2, and would consume a burger (around 400 calories) every day. 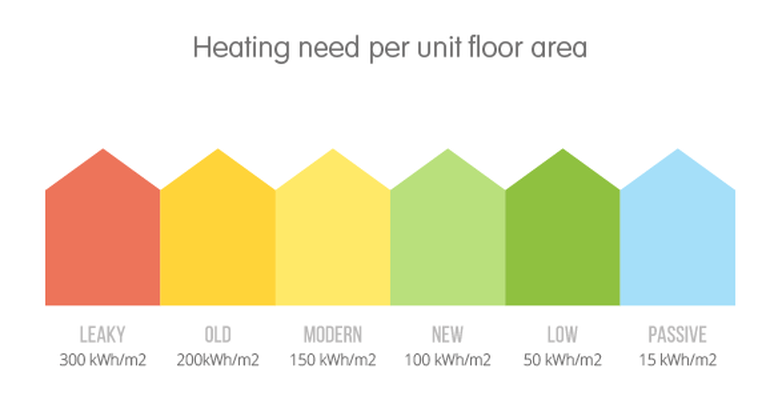 I have found this little diagram explains more clearly than I can the difference between a Passive House heating/cooling consumption compared to other buildings. To achieve this heating/cooling demand, Clare's report tells us what level of insulation and glazing requirements are needed. From this information we were able to start speaking to suppliers, primarily of window manufacturers to assess what was both available and financially viable. These rendered images Anthony made really started to give us a feel for the size of the spaces and what it would look like finished. 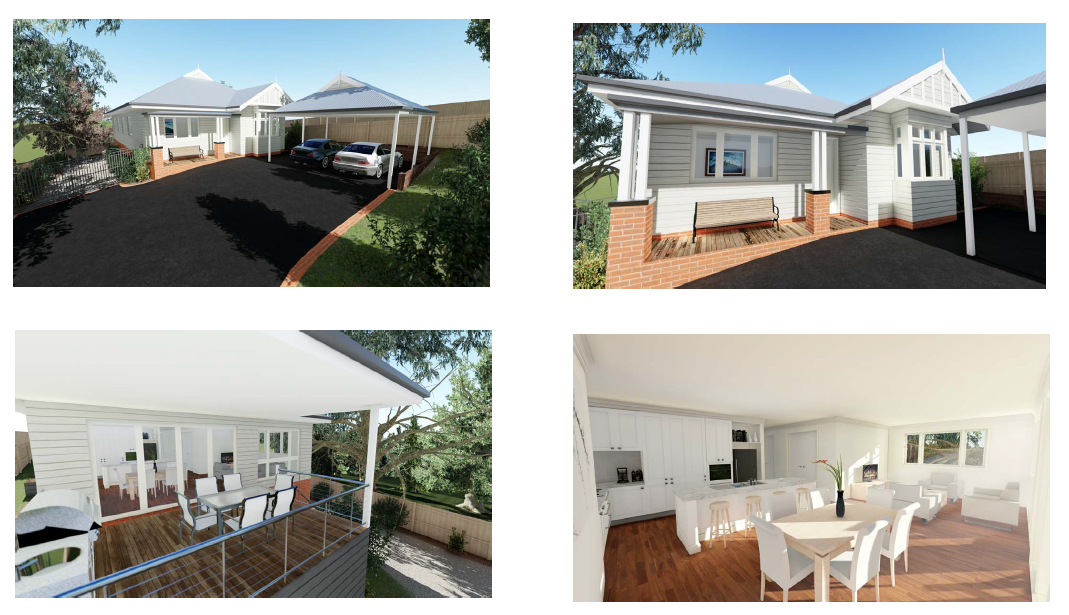 Almost as soon as we had signed that dotted line for the land we bought in Emerald, we started talking to designers to begin the drawings. Devin had met Clare Parry from Grun Consulting, through the Australian Passive House conference. Clare is Chairperson and Treasurer on the Australian Passive House Association, a certified Passive House Designer, an engineer and pretty much the bees knees of the Passive House industry in Australia. Anthony Burns from Virtual Home Design came highly recommended to us. He has an extensive background in energy rating, competed in the BDAV 10 star sustainable design challenge and although not Passive House trained was very enthusiastic about being involved in designing a Passive House. We couldn't be happier with the combination of Anthony and Clare, and feel very fortunate to have them on our team. Once the designers were sorted, the next question is which way is North? If I'm honest, when buying a house or land, orientation is often not on the top of my priority list. Amongst affordability, location, size, distance to shops/schools/work, the slope and possible views, where the sun rises isn't thought of until later when you start designing the house. But don't let this be a deterrent, although there are more preferable orientations for a Passive House, ultimately you can have a Passive House anywhere. This is why countries such as Belgium can make mandatory that all new and renovated buildings from 2015 are to be to the Passive House standard. Amazing to think how advanced they are in their commitment to energy efficient buildings compared to Australia! Therefore, it is important that you keep an open mind about the layout of the house on your land, so that the design can be suited to the unique combinations of your property. For a Passive House the ideal orientation in Australia is to have your living spaces (living room, kitchen, lounge, study, bedrooms) facing North, to gain the warmth of the sun during the day, and the service rooms (laundry and bathrooms) to the South. 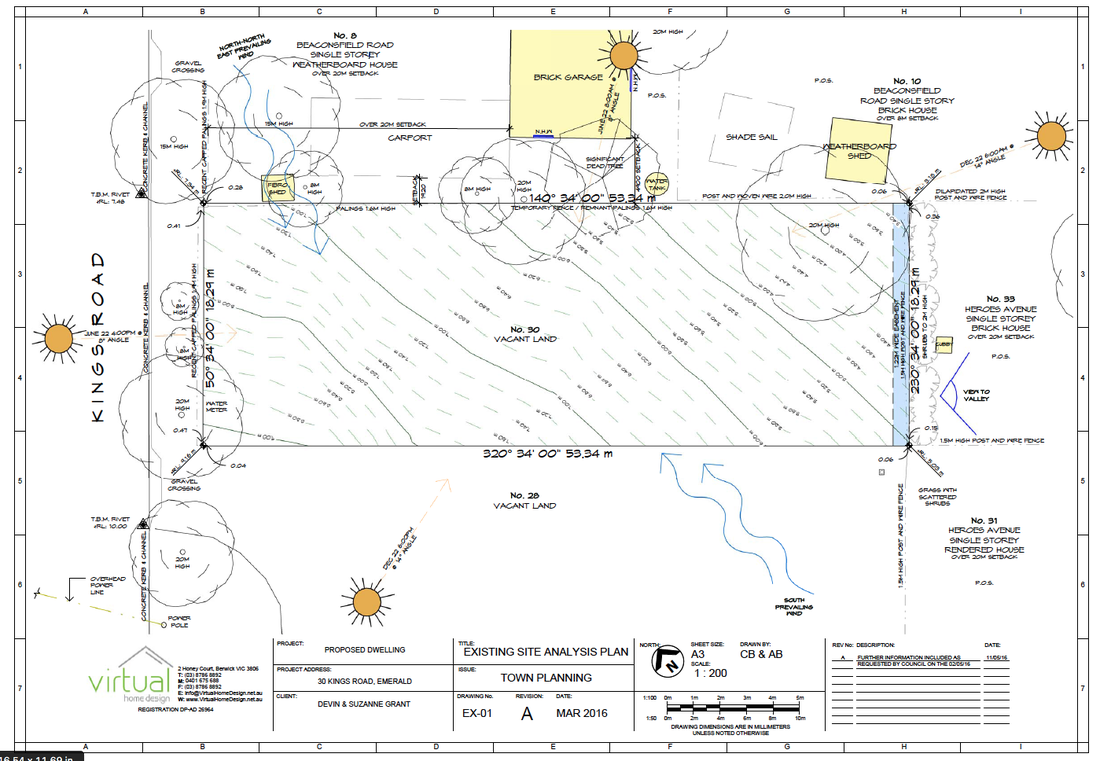 From our site analysis plan above you can see that our land is facing north-east as the house will be designed parallel to the boundary One of the biggest misconceptions we find when we tell people we are building a Passive House is that it has to look modern, Devin and I have always wanted to build a more traditional weatherboard style house for our family home. In fact, from the from the outside there will be nothing that will indicate that it is a Passive House Courtesy of Pinterest, here are some the inspiration we used as a starting point for the design of our home. |
Who we areDevin & Suzanne are building a family home using a Passive House method. Categories
All
Archives
December 2018
|


 RSS Feed
